ANY-maze Help > The ANY-maze reference > The Tests page > Running tests > Before starting a test > Adjusting the apparatus map
Adjusting the apparatus map
![]()
Introduction
Clearly it's important that the apparatus map aligns correctly with the apparatus shown in the live video picture, as ANY-maze uses the map to determine where in the apparatus the animal is.
Nevertheless, it's easy to lose this alignment by moving the apparatus, perhaps when cleaning the room, or by adjusting the camera's position, focus or zoom - see figure 1.
Fortunately, resolving this issue is extremely simple. You don't need to drag the apparatus around the floor - instead, you can drag the apparatus map around the screen.
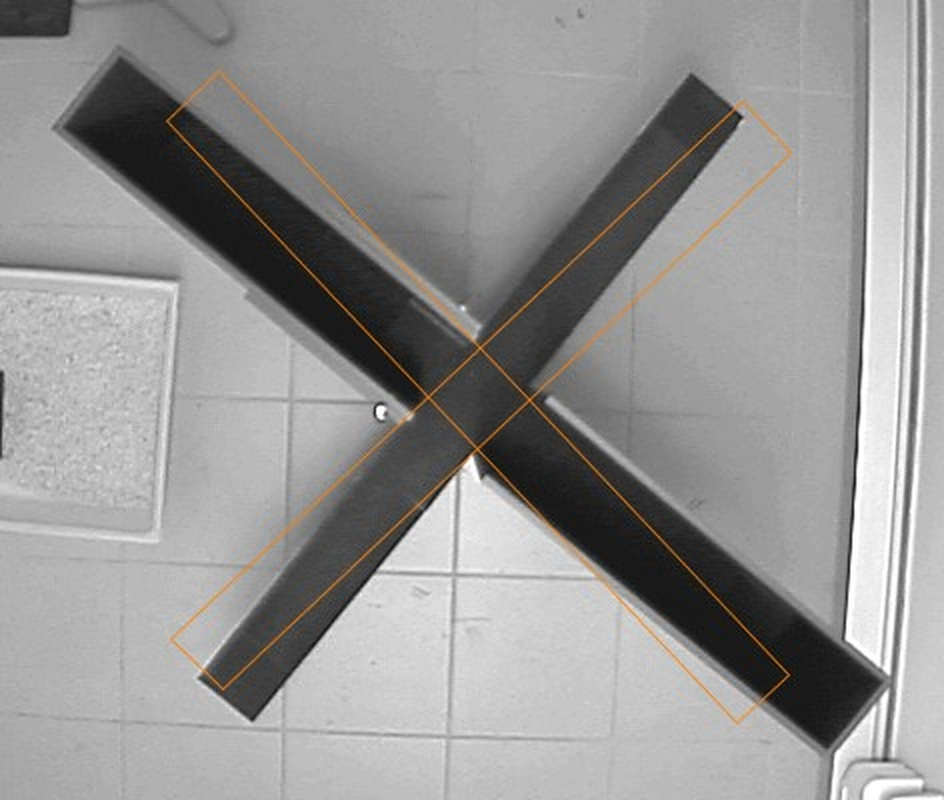
Figure 1. The plusmaze in the video picture doesn't align correctly with the apparatus map. The map needs to be moved a little to the left and rotated slightly.
Details
To adjust the apparatus map you simply need to click the ![]() button displayed above the apparatus video picture on the Tests page. This may cause a message to be displayed advising you that you're about to enter Map adjustment mode, just click OK.
button displayed above the apparatus video picture on the Tests page. This may cause a message to be displayed advising you that you're about to enter Map adjustment mode, just click OK.
In map adjustment mode you can move the map (i.e. drag it), rotate the map or even resize it. All these operations are performed using the mouse. Basically ANY-maze divides the video picture into nine sections (see figure 2) and the operation that the mouse will perform depends on the section it's in - to make this clearer the mouse pointer changes to indicate the operation.
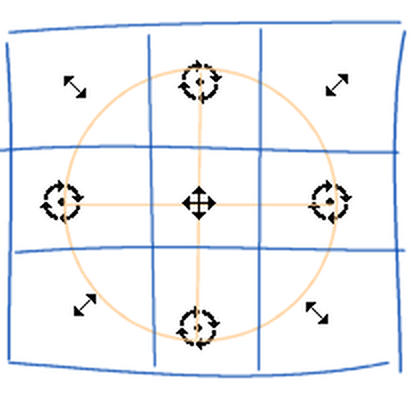
Figure 2. The type of adjustment performed depends on where in the video picture you position the mouse pointer.
Mouse pointer styles and the adjustments they perform:
| Holding the left mouse button down and moving the mouse drags the map. |
| Holding the left mouse button down and moving the mouse rotates the map around its centre point. |
| Holding the left mouse button down and moving the mouse resizes the map. This can be useful if the camera has been moved closer or further from the apparatus, if you've adjusted the lens focus or if you've adjusted the zoom on a vari-focal lens. |
One point to be aware of is that the map is constrained by the edges of the video image (well, to be strictly accurate it has to stay inside a margin of 4 pixels) so you won't be able to perform any adjustments which would take it outside this limit.
Exiting map adjustment mode
To exit map adjustment mode simply click the ![]() button again.
button again.
Resetting adjustments
You can always undo the adjustments that are applied to the apparatus map by entering map adjustment mode, right-clicking on the video picture and selecting "Reset adjustments" from the menu which appears.
How ANY-maze uses the adjusted map
The way ANY-maze applies map adjustments is probably not quite as you'd expect. Although the adjusted map is shown (and used) while tracking, what ANY-maze actually does at the end of the test is to 'un-adjust' the animal's track before saving it - essentially this means that the recorded track has the inverse of the apparatus adjustments applied to it which maps it to the 'standard', unadjusted apparatus map, i.e. the map you drew as part of the Protocol.
The reason ANY-maze works this way is so that all recorded tracks are relative to the same apparatus map. This is required by the ANY-maze results analysis system and also makes it much simpler for you to alter the map at any point in the experiment, perhaps to add a new zone.
Anyhow, this doesn't actually make much difference except when you look at a test's track plot - there you'll find that the plot is drawn relative to the unadjusted map.
![]()
© Copyright 2003-2026 Stoelting Co. All rights reserved
ANY-maze help topic T0800