ANY-maze Help > I/O devices supported by ANY-maze > Test equipment designed specifically for ANY-maze > The Waterwheel Forced Swim Test Tank > Setting up a Waterwheel Forced Swim Test tank for first time use
Setting up a Waterwheel Forced Swim Test tank for first time use
![]()
Introduction
After assembling a Waterwheel Forced Swim Test tank, you need to perform the following steps before you can start using it in an experiment:
| • | Make sure the appropriate driver is installed |
| • | Connect the tank to your PC |
| • | Check that the tank is working correctly |
| • | If you have multiple tanks, you may wish to renumber them |
| • | Activate your ANY-maze licence |
Making sure the appropriate driver is installed
| The 'ANY-maze USB devices' driver is usually installed at the same time as ANY-maze, so it will probably already be installed on your computer. Nevertheless, you should follow the instructions below to check that the driver is installed, before connecting the Waterwheel Forced Swim Test tank to your computer. |
| You must be running ANY-maze as an administrator in order to install drivers. To do this, right-click on the icon you use to start ANY-maze and then select 'Run as administrator' from the menu which appears. (If you run ANY-maze by clicking on an icon in the Windows task bar at the bottom of the screen, then you should right-click the icon, then right-click the entry that reads 'ANY-maze' and then select 'Run as administrator' from the menu which appears). |
IMPORTANT: You should install the driver software BEFORE you connect the Waterwheel Forced Swim Test tank to your computer.
The driver software is a standard component of the ANY-maze system, and can be installed from within ANY-maze itself by following these steps:
| 1. | Close any open experiment. |
| 2. | Switch to the Support page. |
| 3. | In the list on the left side of the page, select Drivers. |
| 4. | The right-hand side of the page will display the ANY-maze driver settings (see figure 1, below) and towards the top of the list, you will see an entry for 'ANY-maze USB devices' which will report the current installed-state of the driver. |
| 5. | If the driver is not installed, then first select it in the list and then click the |
For further details, see the ANY-maze USB device driver topic.
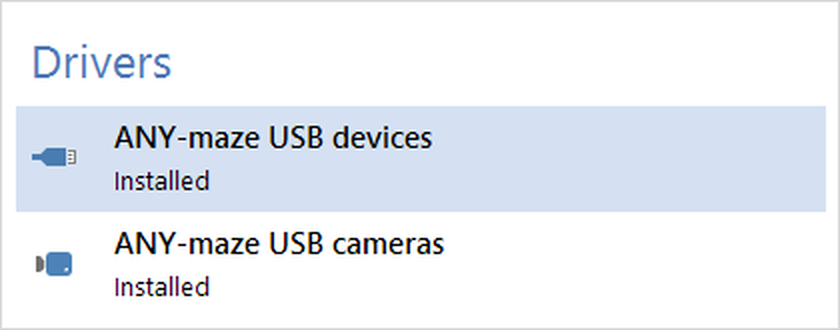
Figure 1. To install the driver, you should select the ANY-maze USB driver entry and then click 'Install' in the ribbon bar.
Connecting a Waterwheel Forced Swim Test tank to your PC
The Waterwheel Forced Swim Test tank connects to a PC via USB, so essentially all you need to do is plug the tank into a USB port on your computer and you're done. But don't forget - before plugging in the tanks, it is important to check that the driver is installed (see above).
The ANY-maze software allows you to run tests in up to 40 Waterwheel Forced Swim Test tanks simultaneously. Of course, if you want to do this, all 40 tanks must be connected to your PC and your computer is unlikely to have sufficient USB ports, especially if it's a notebook. The solution is to use a USB hub, a device which has a single connection to your PC on one side and multiple USB ports on the other. USB hubs are available with as many as 16 ports, but inexpensive 4-port hubs are most common.
There's one thing to watch out for if you use a hub - the Waterwheel Forced Swim Test tanks are powered by USB. In fact, the tanks don't use much power; you will probably be able to connect 3 or 4 to an unpowered hub and they will still work, but if you want to connect more than this to a single hub then you will need what's called a 'powered hub' - i.e. one which has a power supply plugged into it.
Checking that the Waterwheel Forced Swim Test tank is working correctly
Once you have the driver installed and the Waterwheel Forced Swim Test tank connected to your PC, then everything should be working correctly, but it would be nice to check. In fact, this is easy to do; here's how:
| • | In ANY-maze, switch to the I/O page - you can do this by clicking on the I/O tab in the ribbon bar at the top of the screen. |
| • | On the left side of the I/O page is a list of input/output devices, and you should see one entry for each Waterwheel Forced Swim Test tank you have connected to your computer - see figure 2, below. |
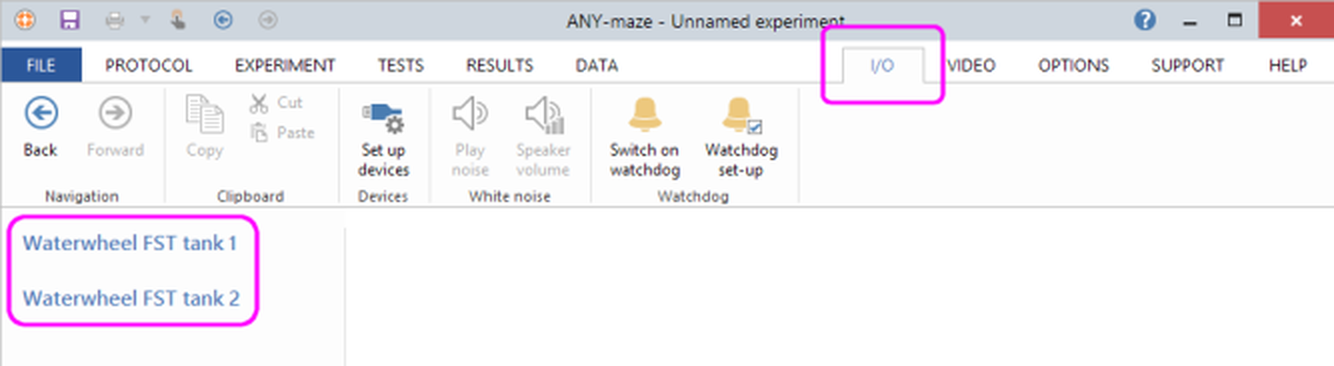
Figure 2. All connected Waterwheel tanks should be listed on the left of the I/O page.
If a tank is not listed in this panel, then:
| 1. | First check that the tank is indeed plugged in. If it is, then unplug it, wait 10 seconds and then plug it back in again - after a few seconds it should appear in the list. |
| 2. | If it still doesn't appear, then follow the instructions above to check that the 'ANY-maze USB devices' driver is installed. If the driver is not installed, then unplug the tank, install the driver and then plug the tank back in again. |
| 3. | And if all else fails, contact ANY-maze Support who will be happy to assist you. |
Assuming your tank is listed, you can check that it is actually working by doing the following:
| • | Select the tank in the list on the left side of the I/O page. |
| • | The tank will 'open' to show a list of its ports. Select the entry for Rotary encoders. |
| • | On the right-hand side of the page, you will see a graphical representation of the wheel. Turn the physical wheel in the tank, and the graphic on the screen should also turn - see figure 3, below. |
| • | Next, from the list of ports, select the entry for Temperature sensor. |
| • | The right-hand side of the page will show the temperature of the sensor in the tank. Hold the sensor in your hand, and it will probably warm-up a little - you should see the reported temperature rise. |
| • | Finally, select the entry for Input switches, |
| • | On the right-hand side of the page, you will see a single input listed called Test Control button - press the push-button on the top of the tank and check that the Test control button shown on the screen changes from red to green. |
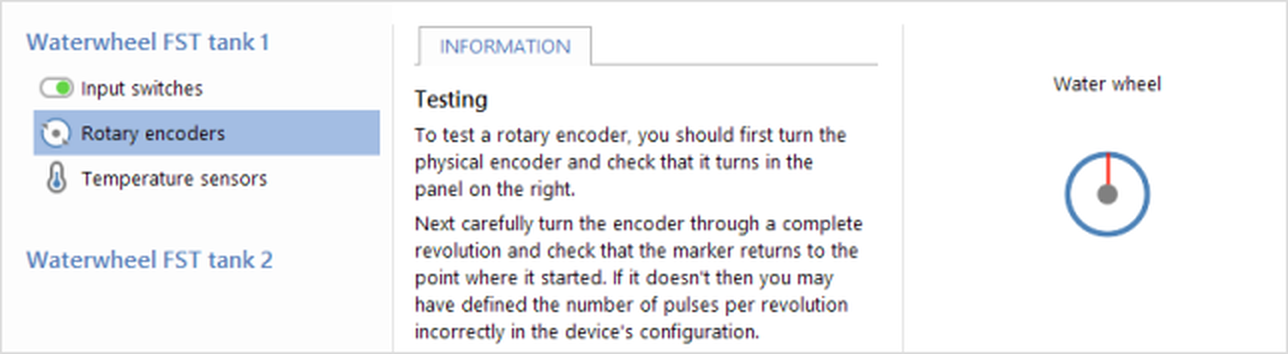
Figure 3. The waterwheel graphic will turn when you turn the physical waterwheel in the tank.
Renumbering the tanks to put them into order
If you have multiple Waterwheel Forced Swim Test tanks, then they will automatically be given sequential numbers by ANY-maze. This numbering starts at 1, so if you have four tanks they will be tanks 1, 2, 3 and 4.
However, the software clearly can't know what physical order the tanks are in, so you may find that the tanks on your bench are numbered something like 3, 1, 4, 2 and obviously it would make much more sense if you could put them into order. Of course, you could move the tanks around, but it's easier to renumber them from within the software, as follows:
| 1. | Switch to the I/O page within ANY-maze. |
| 2. | Select any one of your Waterwheel Forced Swim Test tanks in the list on the left side of the page. |
| 3. | In the ribbon bar, click the |
| 4. | The Renumber Waterwheel Forced Swim Test tanks window will open; click the Start... button. |
| 5. | Press the button on the top of the tank that you want to be tank 1. |
| 6. | Press the button on the top of the tank that you want to be tank 2. |
| 7. | Continue in this way until you have set the numbers of all the tanks, such that they are in the order you want. |
Activating your ANY-maze licence
| You should only activate your licence on the computer you intend to use to actually perform tests in your Waterwheel Forced Swim Test tank(s). |
Before you can run any tests in ANY-maze, you'll need to activate your licence. See Activating your ANY-maze licence to find out how to do this.
See also:
| • | Performing experiments with the Waterwheel Forced Swim Test tank |
| • | Waterwheel Forced Swim Test reference information |
![]()
© Copyright 2003-2026 Stoelting Co. All rights reserved
ANY-maze help topic T1223