ANY-maze Help > I/O devices supported by ANY-maze > Test equipment designed specifically for ANY-maze > The Orofacial pain assessment device (OPAD) cage > Performing experiments with the OPAD cage > Setting up an OPAD cage protocol
Setting up an OPAD cage protocol
![]()
Introduction
In this section, we're going to look at the steps involved in setting up a simple protocol for an OPAD. This can then be used as a basis for more specific protocols, depending on the requirements of your experiments.
As you may already know, protocols are fundamental to how ANY-maze works because it is the protocol which defines how an experiment will be performed. Even if you have never used ANY-maze before, you will probably get along fine just following though the steps in this section, but if you want to know more about protocols then a good place to start is this introductory tutorial on protocols.
| • | Creating an experiment |
| • | Setting the protocol mode and adding an OPAD cage |
| • | Reviewing the OPAD cage input and output protocol elements |
| • | Reviewing the default OPAD charts |
| • | Setting the test duration |
| • | Setting up fields to record additional information about your animals or tests |
| • | Saving the protocol |
Creating an experiment
Before you can do anything in ANY-maze, you need to open an experiment. In this respect ANY-maze is similar to Microsoft Word, where you can't do anything until you open a document. So the first thing you need to do is:
| 1. | Start ANY-maze. |
| 2. | On the opening page select New empty experiment from the list of protocols on the right side of the page. |
If ANY-maze is already running, simply switch to the File page and select New experiment from the list on the left.
Setting the protocol mode and adding an OPAD cage
Now that you have an experiment open, you need to set the protocol mode and then add an OPAD cage to the protocol.
The protocol mode defines which features of ANY-maze will be available; for example, in OPAD mode, you don't need to video track the animals so the features related to tracking will all be turned off.
| 1. | Switch to the Protocol page by clicking the Protocol tab in the ribbon bar. |
| 2. | Click the first item in the list on the left of the page - this will probably be named 'Unnamed protocol'. |
| 3. | If you have an OPAD specific ANY-maze licence (which will usually be the case unless you already owned ANY-maze when you bought OPAD), then the protocol mode will already be 'OPAD thermal cage mode'. If it isn't, or if you want to change to 'OPAD mechanical cage mode', then open the protocol mode list and select this mode, as shown in figure 1. |
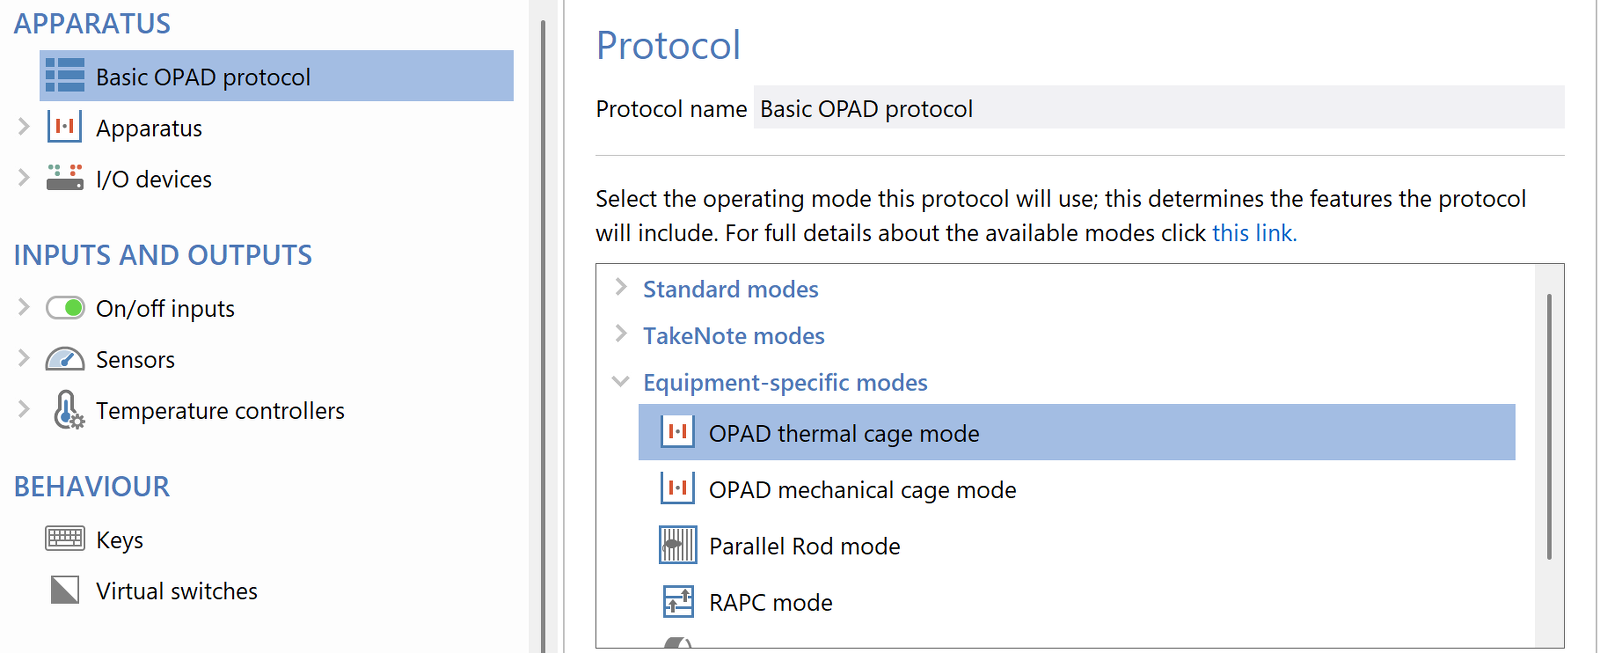
Figure 1. You should use the Protocol mode list to select OPAD cage mode.
You should select the mode appropriate to the type of tests you plan to perform: if you'll be using the thermal stimulus then select the OPAD thermal cage mode. and if you'll be using the mechanical stimulus then select the OPAD mechanical cage mode. The mode you choose will alter the items included in the protocol. For example, in thermal cage mode. the protocol will automatically include items for control of the cages' thermal elements.
| 3. | Next, we need to add our OPAD cage to the protocol. This will tell ANY-maze which cage (or cages) we actually want to use. You can include up to 40 cages in an experiment, but to keep things simple we'll just include one. So, you now need to click the |
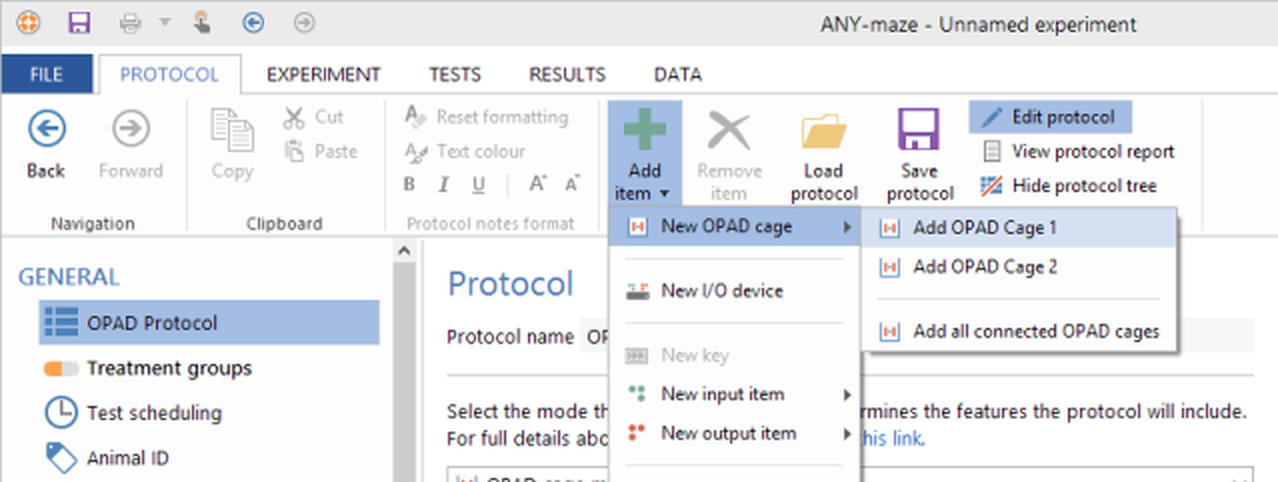
Figure 2. The New OPAD cage menu option opens a sub menu, from which you can choose the cage or cages to add to the protocol.
| 4. | As can be seen in figure 2, the New OPAD cage option opens a sub menu which lists the OPAD cages connected to your computer, together with an option to Add all connected OPAD cages. For this protocol, we just want to include one cage, so select the option to Add OPAD cage 1. |
| 5. | When you add the first OPAD cage to the protocol, a message will appear asking whether you want the thermal elements in the cage to operate independently or not. The answer that you give will be applied to all the cages in the protocol and you won't be able to change your mind (without starting a new protocol), so you should think carefully before answering. That said, the answer will simply depend on the type of test you plan to perform - do you want to apply different temperatures to the animals' left and right cheeks? If you do, then you will want the thermal elements to operate independently, otherwise, you'll want them to be linked. |
| 6. | When you add an OPAD cage, it appears in the protocol list, as in figure 3. |
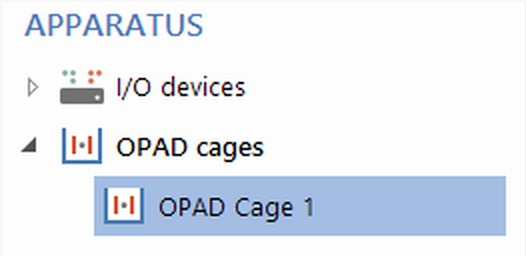
Figure 3. OPAD cages are added to the protocol list.
| 7. | Selecting the cage's entry in the list causes its settings to be displayed in the settings pane to the right of the list; see figure 4. |
By the way, this is how the entire protocol works - you add things using the ![]() Add item button, they get included in the protocol list, and you can then select them and alter the settings in the settings pane.
Add item button, they get included in the protocol list, and you can then select them and alter the settings in the settings pane.
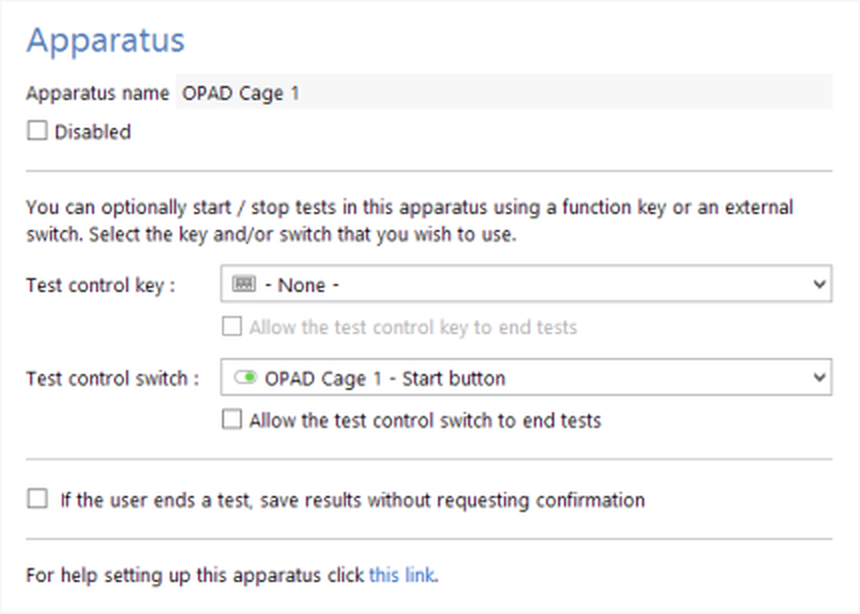
Figure 4. The OPAD cage settings pane.
The settings for an OPAD cage are automatically set to default values, and you probably won't need to change them.
Reviewing the OPAD cage input and output protocol elements
Because ANY-maze already knows you are setting up a protocol for an OPAD cage (because that's the mode we put it into), it will automatically have added various input and output elements to the protocol when we added the OPAD cage. These elements are:
| • | Inputs for the Lick and Contact sensors. You can see these by selecting On/off inputs in the protocol list. These sensors detect when the animal licks the bottle spout and when its cheeks make contact with the thermal elements. |
| • | Inputs for 'Thermal element temperature' and, if the OPAD being used is an early model which includes a weight sensor, 'Drink intake weight'. You can see these by selecting Sensors in the protocol list (see figure 5). |
| • | Outputs for 'Thermal element'. You can see this by selecting Temperature controllers. |
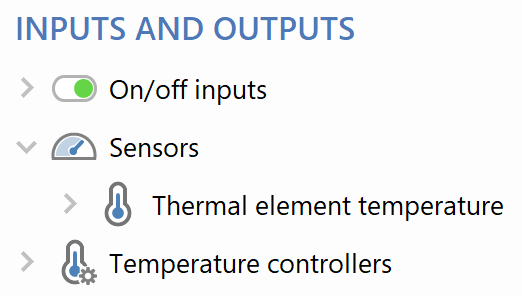
Figure 5. The OPAD sensor inputs are automatically included in the protocol list.
You will usually not need to do anything with the Input elements. However, Outputs are a different matter - let's take a look at the settings for the 'Thermal element' Temperature controller; they're shown in figure 6.
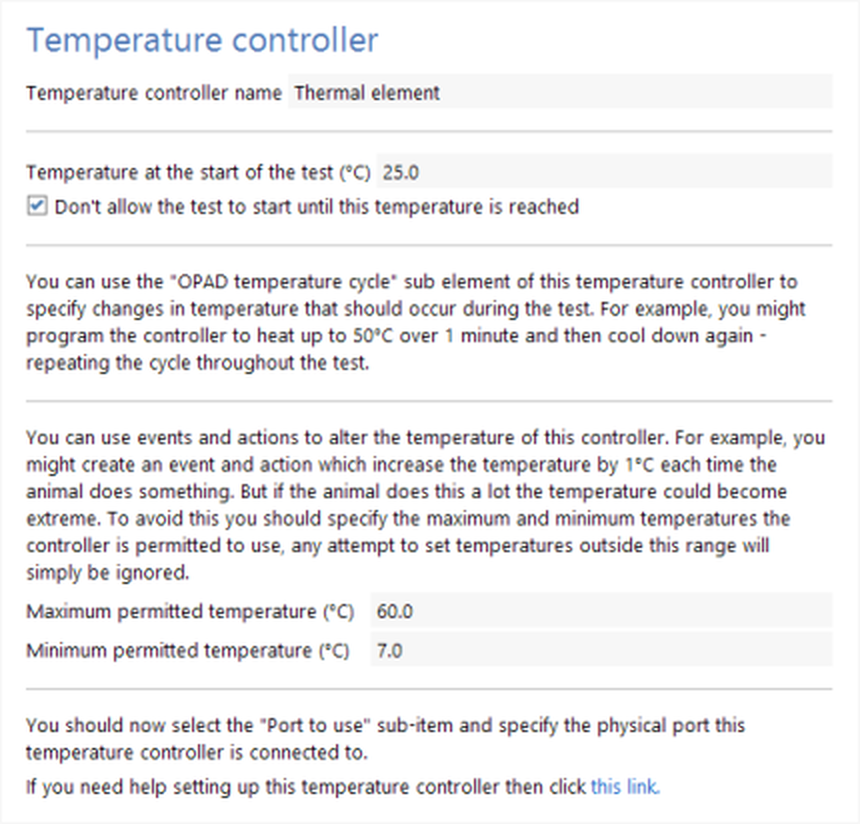
Figure 6. The settings for the OPAD thermal element output
As can be seen, there are a few settings here. Let's review what a couple of them are for:
| • | Temperature at the start of the test. ANY-maze will set the thermal elements to this temperature when it prepares the cage for a test (that is BEFORE the test actually begins). |
| • | Don't allow the test to start until this temperature is reached. If this is selected, then ANY-maze will prevent you from beginning a test until the thermal elements are at their 'start' temperature. This is what you will usually want. While the elements are changing temperature you will see a message telling you the current and 'start' temperatures, so you'll know why the test can't be started. |
So this setting allows you to set the temperature at the start of the test, but what if you want to change the temperature during the test? There are two ways you can do this - first we will look at the simpler one. In the protocol list, select Temperature controllers > Thermal element > OPAD temperature cycle. The Settings pane will display the options shown in figure 7.
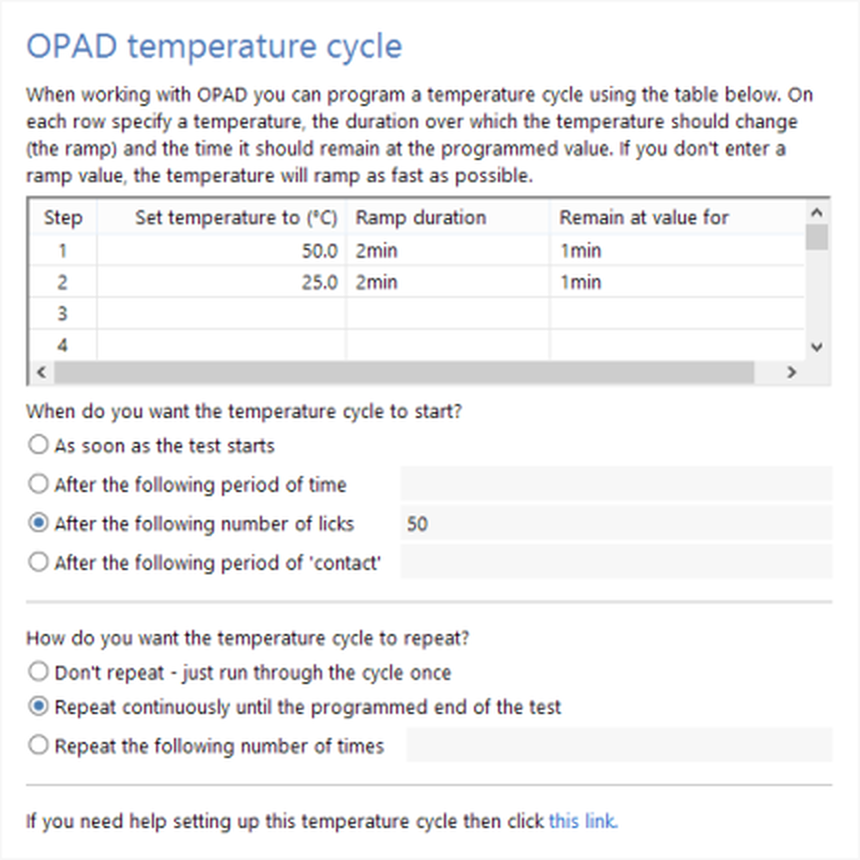
Figure 7. The settings for OPAD temperature cycle
I don't propose to describe these settings in detail (for the curious, full information can be found here), but suffice to say that you can use this page to specify a sequence of temperatures that you want the thermal elements to have. For example, the settings shown in figure 7 will cause the thermal element to change to 50°C, with a 'ramp' duration of 2 minutes (here the 'ramp' is the time taken to change from one temperature to another) and to then remain at this temperature for 1 minute before changing to 25°C, again ramping over 2 minutes, and then remaining at this temperature for 1 minute. This sequence then repeats again and again until the test ends. You might notice that the settings also specify that this sequence should only start after the animal has licked the water bottle spout 50 times.
These 'temperature cycle' settings are very useful and are usually the easiest way to alter the temperature of the thermal elements during a test. However, if you find you want more flexibility then you can use a procedure instead. Procedures can detect essentially any situation that occurs during a test and then take some sort of action because of it. For example, you could create a procedure that would detect each time the animal consumes 1g of liquid from the bottle and make the thermal elements 10°C hotter each time this occurs. If you want to learn more about procedures, then this introduction to procedures is a good place to start.
Reviewing the default OPAD charts
While a test is running in an OPAD cage, you will probably want to know various things, such as: the current temperature of the thermal elements, whether the animal is in contact with the elements, and how much liquid the animal has consumed. By default, this information is made available in the form of charts which are automatically included in the protocol when you add an OPAD cage (although you can of course remove them if you wish).
You can see the charts that are included by selecting Charts in the protocol list - see figure 8.
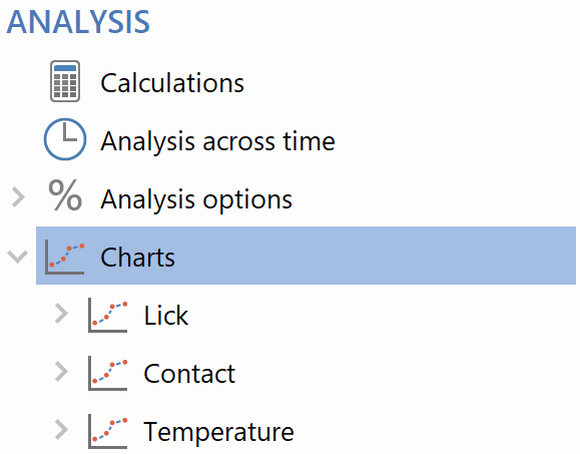
Figure 8. The charts that are automatically included in an OPAD protocol by default
We'll see what the charts actually show us a little later in this tutorial, when we run a test.
Setting up stages and specifying the test duration
Another element that is automatically included in an OPAD protocol is a 'stage'. This is because ANY-maze requires that all protocols always include at least one stage, and OPAD is no exception.
A stage is simply a test (or a group of tests) that you perform on your animals. In many cases, an experiment will simply have one stage consisting of one test (for each animal) and that is the default setting for OPAD. Of course, you can change this if you wish. For example, you might have two stages in your experiment; in the first stage you test the animals without any treatment, while in the second stage you treat them and then test them again. In this case you would simply need to add a second stage to the protocol.
To see the stage select Stages > First stage in the protocol list; the Settings pane will then show the stage's settings, as in figure 9.
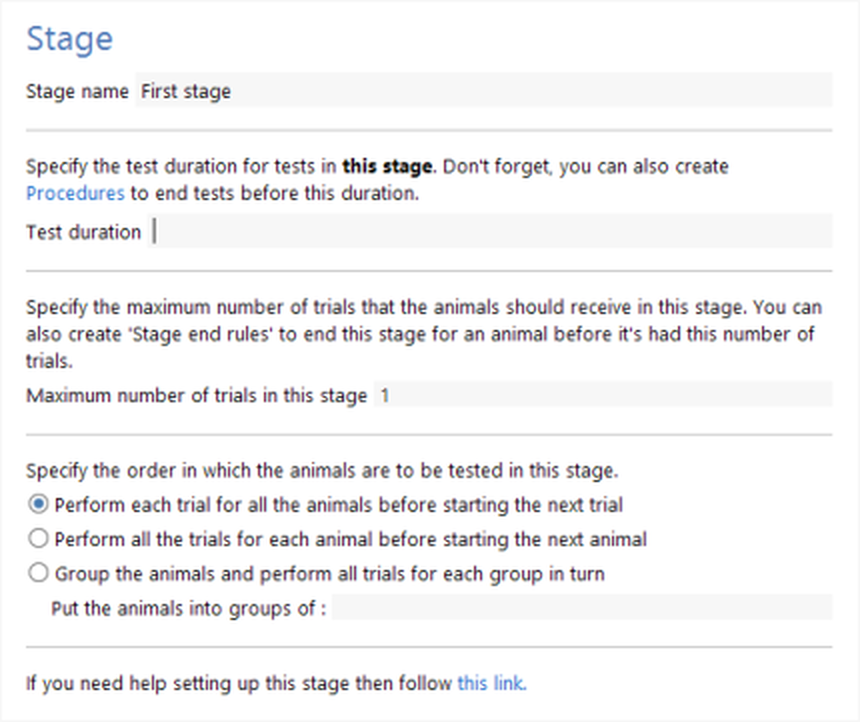
Figure 9. The default settings for the first stage in an OPAD protocol
Full details about stages can be found here, but suffice to say that it is in the stage's settings that you specify the duration of your tests. As can be seen in figure 9, ANY-maze does not include a default duration, so you will need to set this value before you can actually perform any tests.
Setting up fields to record additional information about your animals or tests
| This step is optional |
If you wish, you can set up 'fields' in your protocol to record additional information about your animals or tests. For example, you may be keen to differentiate between how male and female animals respond, in which case you will presumably want to record their Sex somewhere. Of course, you could just note this on a piece of paper, but instead you could set up a 'Sex' field and record the data within ANY-maze. Not only would this mean that all the data relating to the experiment would all be in one place, but you could also then use ANY-maze's analysis features to analyse the animals' sex - perhaps to check that there is no significant difference between male and female animals.
You can create any number of fields, and they can be used as either independent or dependent variables in analysis. Full details about fields and how to set them up can be found here.
Save the protocol
You may have noticed that other than adding the OPAD cage (or cages) to the protocol, we haven't had to add, or even edit, anything else. Nevertheless, you will typically alter the default settings a little and usually you will either set up an OPAD temperature cycle, or add a procedure to adjust the thermal element temperature during the test. This being the case, you will usually want to save the protocol so you can use it again in other experiments. To do this, you need to click the ![]() Save protocol button in the ribbon bar.
Save protocol button in the ribbon bar.
What next?
In this topic, we created a simple OPAD protocol. Now that we have this set up we are ready to move on to the next topic of this tutorial - Running tests in an OPAD cage
See also:
| The topics listed below are general topics relating to ANY-maze and may refer to features not available or required with OPAD. |
| • | An introductory tutorial on protocols |
| • | The elements of a protocol |
| • | Adding elements to a protocol |
| • | Editing the elements of a protocol |
| • | Deleting elements from a protocol |
| • | Saving and loading protocols |
| • | Viewing the protocol report |
![]()
© Copyright 2003-2026 Stoelting Co. All rights reserved
ANY-maze help topic T1201