ANY-maze Help > The ANY-maze reference > The Protocol page > The elements of a protocol > Testing > Procedures > Writing a procedure using the procedure editor > A more complex example
A more complex example

Introduction
This topic describes how to create an example procedure to perform some slightly more complex functionality. If you haven't already done so, I highly recommend that you work through the simple example in the Writing a procedure using the procedure editor topic. This will give you some fundamental starting points.
This example will not guide you through the steps in quite as much detail as the previous one, but it will cover a few more aspects of what you can do with procedures.
What do we want the procedure to do?
Let's create a procedure that will end the test if the animal fails to enter a specific zone for a given length of time (say 20 seconds).
 | This is perhaps an unrealistic example, but it will serve to demonstrate some of the more advanced flexibility of procedures. |
Set-up
Before we can write the procedure, we'll need to set up a protocol that has the right zones, so you'll need to do the following:
| 1. | On the File page, select New experiment and then New empty experiment. |
| 2. | Give the protocol a name (e.g. 'Procedure example 2') |
| 3. | Select the Treatment groups item in the protocol list and specify that the animals should be randomly assigned amongst the groups. |
| 4. | Click the  Add item button and select New video source. Add item button and select New video source. |
Give the video source a name and then select "An ANY-maze example video" as the physical source of video images. Select the 'Open field example video' from the drop-down list.
 | If you don't see the option to select an ANY-maze example video on the video source page, you may need to enable the use of examples on the Options page under Features for new users. |
| 5. | Click the  Add item button and select New apparatus. Add item button and select New apparatus. |
Give the apparatus a name and then set up the apparatus as follows:
• Using the  Rectangle tool button, draw the outline of the apparatus around the floor of the box.
• Move and resize the ruler to be along the edge of the box. In the The length of the ruler line is (mm) field, enter '400'.
• Use the  Grid settings button to create a grid spaced at 10cm, crossing at the centre.
The resulting apparatus should look like this:

Figure 1. Set up the apparatus using the grid settings, so it looks like this.
| 6. | Click the  Add item button and select New zone. Add item button and select New zone. |
Specify a zone called 'Centre' and select the four squares at the centre, as follows:

Figure 2. The centre zone.
| 7. | Select the Animal colour item in the protocol list and specify that the animals are lighter than the background. |
| 8. | Under the Stages option in the protocol list, select First stage and enter a Test duration of 90s. |
To finish off the set-up, we need to switch to the Experiment page and enter at least one treatment and a number of animals, before saving the experiment file.
Creating the procedure
The first thing we need to do when creating a procedure is to try and summarise what it needs to do, in simple steps. In this case, we're waiting for the animal to enter the centre zone. If 20s elapses, without this happening, then we end the test.
The logic for this will be something along the following lines:
| • | Wait until the animal enters the zone, or 20s elapses. |
| • | If 20s elapsed, then end the test. |
Let's create the procedure - use the  Add item button, and select 'New procedure'. Give it a name, say 'Procedure example 2'. (Note that you may remember from the first worked example that the naming of a procedure is important - but I've deliberately suggested a bad name here, which we'll come to later!)
Make sure the procedure is in 'Full' mode, rather than 'Simple' mode, using the  Full view button on the ribbon bar. (If the procedure editor is already in 'Full' mode, you'll only see the
  Simple view button).
The first thing we'll do is drag in a Wait until statement:

Figure 3. The first Wait until statement.
But now we have a problem. We want to wait for one of two possible events to happen - either the animal entering the zone, or 20s elapsing. We can't add another Wait until statement, because the procedure would wait for the first event, and then wait for the second - and it would only get to the second Wait until statement if the first event had already occurred. Obviously, this is not what we want.
ANY-maze provides two Logical operators which can be used to check for multiple conditions at a time:
| • | AND | This can be used to bundle together multiple True/False items, and will evaluate as True if ALL of them are True. |
| • | OR | This can be used to bundle together multiple True/False items, and will evaluate as True if ANY of them are True. |
An important point, which is worth remembering, is that only one event can occur at a time in ANY-maze (and can therefore can be processed by procedures at a time) - so you can't use an AND operator to wait for multiple events. (In fact, if you try to do this in a procedure, it will result in an error when the procedure is checked for errors, or when you leave the procedure editor).
In our case, we need to wait for a zone entry OR time elapsed, so expand the Logical operators heading on the Statements tab, and drag the OR operator into the procedure:

Figure 4. The OR logical operator, dragged into the Wait until statement.
 | A Wait until statement can wait for multiple conditions as long as only one of them is an event - for more details, see the Wait until statement topic. |
Now we just need to fill in the two events that we're waiting for. Switch to the Events tab, and under the Zones heading, expand the Centre zone. Drag the Animal enters Centre zone event into the procedure as follows:

Figure 5. Dragging the zone entry event into the logical operator.
On the right-hand side of the OR operator, we need to specify a 'time' event, i.e. a specific time has elapsed. Just above the zone events in the list of events is a section entitled Timers, which contains a single event called Time elapsed. Drag this into the procedure, on the right-hand side of the OR operator.

Figure 6. Dragging the timer event into the logical operator.
To finish setting up this timer, all we need to do is enter in the 'hole' in the timer event the time that we're waiting for - so click on the empty parameter and type in '20s':

Figure 7. Entering the time for the timer event.
 | Along with other places in ANY-maze that accept a time, you can type a time here in any valid format - for example '1min 25s', '0.5s', etc. |
Some things to note here, before we continue:
| • | The Time elapsed event will start timing as soon as it is encountered by the procedure. So in this example, it starts as soon as the test has started; however if there were other procedure statements before it, the timer would not start timing until all those statements had run and the Wait until statement was first encountered. |
| • | You may notice that the timer shows the text '(Timer 1)' after it. It's possible to have a procedure wait for multiple Time elapsed events, at different stages of a procedure, so each one is given a unique ID - this allows statements further on in the procedure to refer to this timer without any ambiguity. We'll see more on this in just a moment. |
| • | What happens if there are more than two possible events that you want to wait for? For example, you might have four corner zones, and you want to wait for the animal to enter any one of the four. In this case, you simply 'nest' these operators - i.e. you can put an OR operator inside another OR operator (and then another OR operator inside that). |
In fact, this applies to all Logical operators - any number of AND and OR operators can be nested inside each other, to any level (although I wouldn't advise doing too much of this, as it can make the procedure very difficult to read!)
The procedure is now set up to wait for the relevant events, but what do we want to do when one of them happens? Well, if it's the zone entry event that occurred, we have nothing further to do - but if it's the 20s elapsed, we need to end the test. So we need a way of checking which event it was that happened.
The way we do this in a procedure is to use an If statement. This statement checks for one of a number of conditions, and can execute a different set of statements depending on which condition is true. In our procedure, we only need to check for one thing - whether it was the time that elapsed (rather than the zone entry) which caused the procedure to continue running after the Wait until statement. So we'll just use a simple form of the If statement.
Switch to the Statements tab, and you'll see the fourth statement in the list is the If statement. Drag it into the procedure, below the Wait until statement, as shown here:

Figure 8. Dragging the If statement into the procedure.
You'll notice that the If statement has been expanded to become a 'container'. We can put statements inside this container, and then if the condition is true, the procedure will run the statements inside the container.
We now need to enter the condition that we're checking for; so we want to add the 'timer' event as a condition. There are a couple of ways we could do this:
| 1. | Switch to the Events tab, then drag the Time elapsed event from here into the relevant 'hole' in the If statement. |
| 2. | Copy the Time elapsed event from its existing position on the right-hand side of the Wait until statement. |
To do this, hold down the 'Ctrl' key on the keyboard, and drag the event using the mouse from the right-hand side of the statement into the 'hole' in the If statement. (As you drag the event, you should see a little '+' next to the image of the event being dragged, to show that it's being copied, rather than moved. If you don't hold down the 'Ctrl' key, you'll move the event from one place to another).
Whichever of these methods you choose, you should end up with the procedure looking like this:
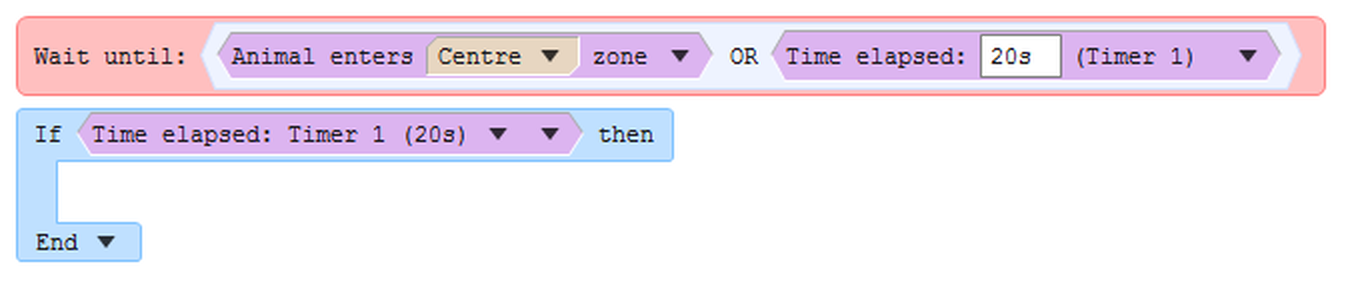
Figure 9. The Time elapsed event, dragged or copied into the If statement.
You'll notice that the timer event in the If statement refers to 'Timer 1'. This clarifies that we're looking at the same timer that the Wait until statement was waiting for. It's obvious in this case, as there's only one timer in the procedure, but in more complex procedures with multiple timers, you might need to refer to the timer ID to know which one is which. If necessary, you can use the drop-down arrow to the right of the timer to select between different timers that the procedure has previously waited for.
Note that for more advanced procedures, If statements can have more conditions - see the worked example using I/O for a simple example of this.
The last thing to add to the procedure is to end the test when the timer has elapsed. If you've gone through the first worked example, then you'll already have seen how a procedure can end a test, but we'll introduce something slightly more advanced here.
Ending a test is an Action, so switch to the Actions tab. The first action you'll see in the list is the End the test action, which we used in the first example. Just below that, however, is the action End the test (specifying reason). Drag this action into the procedure, inside the If statement:

Figure 10. Dragging the action into the procedure.
You might remember from our first example that when you use the End the test action, the name of the procedure is used as the test end reason (and that this reason can be used in analysis). However, at the start of this example, we named this procedure 'Procedure example 2', and we don't really want that to be listed in our test results as the reason that the test ended! This new action that we've just dragged into the procedure gives us the opportunity to create our own test end reason (incidentally, one that you could reuse from different procedures in the same protocol if you wanted to).
This test end reason is a 'parameter' to the End the test action, and you'll see that it's currently set to '...' (which is what ANY-maze displays when it has nothing set for a specific parameter).
Just to the right of the empty parameter is an edit button ( ), which allows you to edit the parameter, and a drop-down arrow that allow you to select from any pre-existing test end reasons in the protocol (for example, any that you might have set up for other procedures).
Click the drop-down arrow, and a menu will drop which contains the option  Create new test end reason. If you select this option, the Test end reason settings window will open; the default name will include our not-very-useful procedure name, so edit it to say something like 'Failed to enter Centre within 20s' and click OK. Remember that this reason will be used in test results, so it needs to be succinct but explanatory.
Your procedure is now complete, and should look like this:

Figure 11. The completed procedure.
Summary
We've seen a few new concepts in this example:
| • | The ability to wait on multiple events |
| • | The introduction of an If statement |
| • | Specifying your own test end reasons. |
Although this example only uses these in a very basic way, hopefully you can see that the options available could be quite flexible and can allow your procedures to perform some quite complicated test control.
What next?
If you use I/O with ANY-maze, I strongly suggest that you also look at the worked example using I/O. Even if you don't have any I/O connected, it's probably a good idea to work through this example anyway, as it introduces some more useful features of procedures.
Otherwise, I suggest that you have a play with the procedure editor, and try some things out for yourself to see what it can do! Take a look at the Events tab on the procedure editor, and expand all the headings to see what your procedure can respond to; on the Actions tab, expand the headings to see the things that your procedure can do to affect the test (this will be particularly useful if you have any I/O set up in your protocol).
If you require any assistance with writing procedures for your specific experiments, please contact ANY-maze Support and we'll be happy to help.

© Copyright 2003-2026 Stoelting Co. All rights reserved
ANY-maze help topic T0462