ANY-maze Help > The ANY-maze reference > The Protocol page > The elements of a protocol > Testing > Procedures > Writing a procedure using the procedure editor > A worked example using I/O
A worked example using I/O

Introduction
This topic describes an example walk-through to manipulate input/output devices (usually abbreviated to I/O) using procedures. If you haven't already done so, I highly recommend that you work through the simple example in the Writing a procedure using the procedure editor topic. This will give you some fundamental starting points. It would also be a good idea to work through the more complex example too.
The steps in this example will not be explained in quite as much detail, but we'll cover more aspects of what you can do with procedures.
 | It's highly unlikely that you will have the right I/O devices to actually make this example work, but this walk-through is intended to give you some ideas of what's possible with procedures and I/O in ANY-maze. Once you've completed this example, I suggest you use the concepts learnt to try writing your own procedures, using the I/O that you do have available. |
What do we want the procedure to do?
Let's assume that we have an experiment in which the animal will receive some sort of reward (a pellet). However, in order to receive the pellet, it must press a lever first. If the animal tries to get the reward without first pressing the lever, it will get a shock.
Set-up
Before we can write a procedure, we'll need to set up a protocol that has the right zones and I/O, so you'll need to do the following:
| 1. | On the File page, select New experiment and then New empty experiment. |
| 2. | Give the protocol a name (e.g. 'Procedure example 3') |
Specify that the protocol mode should be 'Video tracking mode with input/output'.
| 3. | Select the Treatment groups item in the protocol list and specify that the animals should be randomly assigned amongst the groups. |
| 4. | Click the  Add item button and select New video source. Add item button and select New video source. |
Give the video source a name and then select "An ANY-maze example video" as the physical source of video images. Select the 'Open field example video' from the drop-down list.
 | If you don't see the option to select an ANY-maze example video on the video source page, you may need to enable the use of examples on the Options page under Features for new users. |
| 5. | Click the  Add item button and select New apparatus. Add item button and select New apparatus. |
Give the apparatus a name and then set up the apparatus with a simple rectangular border, and a rectangular area in the top right corner:

Figure 1. Set up the apparatus with an area in the top right corner.
| 6. | Click the  Add item button and select New zone. Add item button and select New zone. |
Specify a zone called 'Pellet dispenser' and select the top right-corner.
| 7. | Click the  Add item button and select New I/O device. Add item button and select New I/O device. |
| 8. | Click the  Add item button and select New output item then New output switch. Give it a name of 'Pellet dispenser'. (When you leave this item, select Ignore on the warning message about not having selected a port). Add item button and select New output item then New output switch. Give it a name of 'Pellet dispenser'. (When you leave this item, select Ignore on the warning message about not having selected a port). |
| 9. | Click the  Add item button and select New output item then New shocker. Give it a name of 'Shock floor' and an arbitrary duration and intensity. Add item button and select New output item then New shocker. Give it a name of 'Shock floor' and an arbitrary duration and intensity. |
Again, when you leave this item, select Ignore on the warning message about not having selected a port.
| 10. | Click the  Add item button and select New input item then New On/off input. Give it a name of 'Lever'. Add item button and select New input item then New On/off input. Give it a name of 'Lever'. |
Once again, when you leave this item, select Ignore on the warning message about not having selected a port.
| 11. | Select the Animal colour item in the protocol list and specify that the animals are lighter than the background. |
| 12. | Under the Stages option in the protocol list, select First stage and enter a Test duration of 90s. |
Now we're ready to create the procedure!
What does the procedure need to do?
So how do we go about creating this procedure? Well, the first thing we need to do is try and break the logic up into simpler parts.
To do this, we'll split the procedure into:
| • | Logic to do with the lever |
| • | Logic to do with the pellet dispenser |
Rather than try to incorporate all this in a single procedure, we'll actually create two procedures to implement this logic.
We'll create a 'variable' that allows us to keep note of whether the animal has pushed the lever, and share this variable between both the procedures. A variable is a kind of temporary storage for the procedure, which allows you to keep track of a specific value during the procedure. We can set our variable in one procedure, when the lever is pressed, then use this variable in the other procedure to determine whether to activate the pellet dispenser.
We could use a simple True/False value (i.e. 'Has the lever been pressed?'), but in order to demonstrate some other capabilities of a procedure, we'll actually count the number of times the lever is pressed and call the variable 'Lever press count'. This value will be incremented every time the animal presses the lever.
This gives us the following logic:
| • | Procedure 1: |
Wait until animal presses the lever
Increment 'Lever press count' by 1
 | We'll use a loop to ensure that this procedure runs repeatedly throughout the test. |
| • | Procedure 2: |
Wait until animal enters the 'Pellet dispenser' zone
If the lever press count is 1 or more
Activate the pellet dispenser
otherwise
Activate the shock floor
Reset the lever press count to zero
 | Again, we'll use a loop to ensure that this procedure runs repeatedly throughout the test. |
As you can see, breaking apart the logic for the test makes each of these procedures quite simple in what it needs to achieve.
Creating the first procedure
We'll start with the 'Lever press' procedure. Create a new procedure (using the  Add item button, and selecting New procedure). Give it a name of 'Lever press'.
Make sure the procedure is in 'Full' mode, rather than 'Simple' mode, using the  Full view button on the ribbon bar. (If the procedure editor is already in 'Full' mode, you'll only see the
  Simple view button).
The first thing we'll do is create the variable that will be used to keep track of lever presses. Use the  Create variable button to create a variable, and edit its name to 'Lever press count'.
This variable will be shared between procedures, so make sure you check the box labelled This variable is shared across all procedures run for a test.

Figure 3. Setting up the 'Lever press count' variable. Note that this variable is shared across all procedures.
Once you've created the variable, you'll see it's been added to the list of variables on the Variables tab:
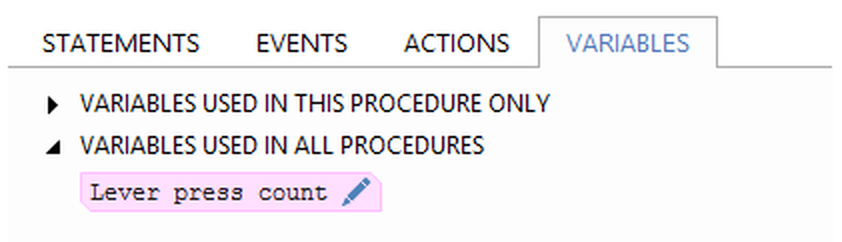
Figure 4. The Variables tab, showing the new variable.
Now we can start writing the procedure. Just to remind ourselves, this will wait until the animal presses the lever and then increment the 'Lever press count' variable. This will be done continually throughout the test, so we'll put it in a loop.
We'll start off with the loop - to do this, select the Statements tab, and drag the Repeat statement into the procedure:

Figure 5. Dragging the Repeat statement into the procedure.
We could now drop the little arrow next to the 'While' on this statement, and select 'Forever'. This would run this loop for the entire duration of the test. However, we'll do something slightly different (but which will have exactly the same effect), using a built-in variable.
Select the Variables tab. You'll see a number of headings under this tab, one of which is expanded to show the variable we created earlier. Just to see the wealth of information on offer, right click anywhere in the pane under the tab, and select the  Expand all option - this will open all the headings to show all the available built-in variables. All of these are available to allow your procedures to use information about the currently-running test. Take a moment to look through these variables, just to see the kind of things that ANY-maze can tell the procedure. Moving the cursor over any of the items will show a tool tip that gives some more explanation.
The variable we're interested in is under the Test information heading - it's called Test is running. Note the shape of this built-in variable - it has two angled ends, which means it's a True/False value, and can be used in the procedure anywhere where a True/False value is permitted - in this case, as a 'condition' of the Repeat statement.
This particular variable will be True once the test starts, and will continue to be True while the test is running. Once the test ends, this variable will be False.
To use this variable in the procedure, just drag it from the left-hand side into the 'hole' in the Repeat statement:

Figure 6. Dragging the Test is running variable into the procedure.
Now that we've got the loop in place, we can set its contents. Whatever sequence of statements we include within this loop will run continuously throughout the test.
First of all, we need to wait for an event to occur, so select the Events tab. If you have already read the Hints and tips for writing procedures topic, you may recall that we have a shortcut for adding a 'wait' for an event - dragging an event into a procedure will automatically create a Wait until statement for it.
The event we will wait for is the lever press, so make sure the On/off inputs heading is expanded, and select the Lever sub-heading to expand it. You should see events here for activation and deactivation of the lever; select the Lever activated event, and drag it into the middle of the Repeat statement:

Figure 7. Dragging the 'Lever activated' event into the procedure. This automatically adds the Wait until statement.
Once the animal presses the lever, we need to increase the value of the 'Lever press count' variable. Select the Variables tab, and you should see the 'Lever press count' variable under the Variables used in all procedures heading. Drag the variable into the procedure, inside the Repeat statement and after the Wait until statement (here we're using another shortcut - dragging a user-defined variable into a procedure will automatically create a Set value statement for the variable):

Figure 8. Dragging the 'Lever press count' variable into the procedure. This automatically adds the Set value statement.
Now we need to enter the second parameter (the right-hand side) of the Set value statement. We're incrementing the value of the 'Lever press count' variable, so what we're doing is the following:
Set 'Lever press count' to 'Lever press count' + 1
For this, we need the maths operator '+', which is on the Statements tab. Switch to this tab and expand the Maths functions & operators heading. You should see all the available maths operators, including '+' which is at the top of the list. Drag this into the procedure, over the 'hole' on the right-hand side of the Set value statement:

Figure 9. Dragging the '+' operator into the procedure.
Note here the shape of the operators, and also the shape of the 'holes' in the operator that we've just dragged. They're 'lozenge' shaped, i.e. with curved ends - in the ANY-maze procedure editor, this shape represents a numerical value. So you can see that the '+' operator accepts two numerical parameters, and will give a numerical value as its result.
Now we need to fill in the two sides of this operator. The right-hand side is just the value 1, so click on the right-hand 'hole' and type in the value 1:

Figure 10. Entering the value 1 into the right-hand side of the addition operator.
For the left-hand side, we need to insert the 'Lever press count' variable. There are a couple of ways we could do this:
| 1. | Switch to the Statements tab, then drag the variable from here into the relevant 'hole' in the '+' operator; |
| 2. | Copy the 'Lever press count' variable from its existing position on the left-hand side of the Set value statement. |
To do this, hold down the 'Ctrl' key on the keyboard, and drag the variable using the mouse from the left-hand side of the statement into the 'hole' on the right. (As you drag the variable, you should see a little '+' next to the image of the variable being dragged, to show that it's being copied, rather than moved. If you don't hold down the 'Ctrl' key, you'll move the variable from one place to another).
Whichever of these methods you choose, you should end up with the following:

Figure 11. The complete 'Lever press' procedure.
One point to note here is that we haven't done anything about initialising the value of the 'Lever press count' variable at the start of the procedure. That's OK, because all variables are initialised to zero at the start of a procedure (unless you've changed their settings to specify that they should retain their value between trials for an animal).
Before we continue, just click the  Check for errors button to make sure that the procedure doesn't have any errors.
So now the first procedure is set up, let's have a go at creating the second. As a reminder, this procedure will wait for the animal to enter the 'Pellet dispenser' zone; if it's already pressed the lever, then it will get a pellet; if not, then it will get a shock via the shock floor.
Creating the second procedure
Create a new procedure (using the  Add item button, and selecting New procedure). Give it a name of 'Pellet dispenser'.
Once again, our procedure will continue to run throughout the test, so we'll again use a loop - switch to the Statements tab and drag the Repeat statement into the procedure. This time, just drop the list next to 'While' and select 'Forever':

Figure 12. The Repeat loop for the second procedure.
Now we'll add the event that we're waiting for (i.e. the animal's entry to the pellet dispenser zone). Select the Events tab, find the 'Pellet dispenser' zone in the list of zones, and expand it to see the events for zone entry and exit. Drag the Animal enters pellet dispenser zone event into the procedure, inside the Repeat statement:

Figure 13. Dragging the Wait until statement into the procedure.
Once the animal enters the zone, we need to check whether it has previously activated the lever. This will use the value of the 'Lever press count' variable, which is being incremented by our first procedure; if the lever press count is greater than zero, then we'll activate the pellet dispenser; if not we'll activate the shock floor.
How do we determine whether the value of the 'Lever press count' variable is greater than zero? We use a Comparison operator to compare the variable's value to 0. Switch to the Statements tab, and expand the Comparison operators heading. You'll see a number of comparison operators, allowing you to compare whether values are equal, not equal, greater than, greater than or equal, less than, less than or equal. In fact, we could use quite a few of these:
| • | Not equals (not =), to check whether the value is not equal to zero |
| • | Greater (>), to check whether the value is greater than zero |
| • | Greater than or equals(>=), to check whether the value is greater than or equal to 1 |
We'll just use the 'greater than' operator (the last-but-one in the list), so select that and drag it in to the procedure, just under the Wait until statement (again, we're using one of the shortcuts described in the Hints and tips for writing procedures topic to automatically create the If statement for the operator).
You should end up with the following:

Figure 14. Dragging the 'greater than' operator into the procedure, which automatically creates the If statement.
We're comparing the value of the 'Lever press count' variable, so select the Variables tab, and drag the 'Lever press count' into the left-hand side of the 'greater than' operator. Click on the right-hand side and type in '0' to give the following:
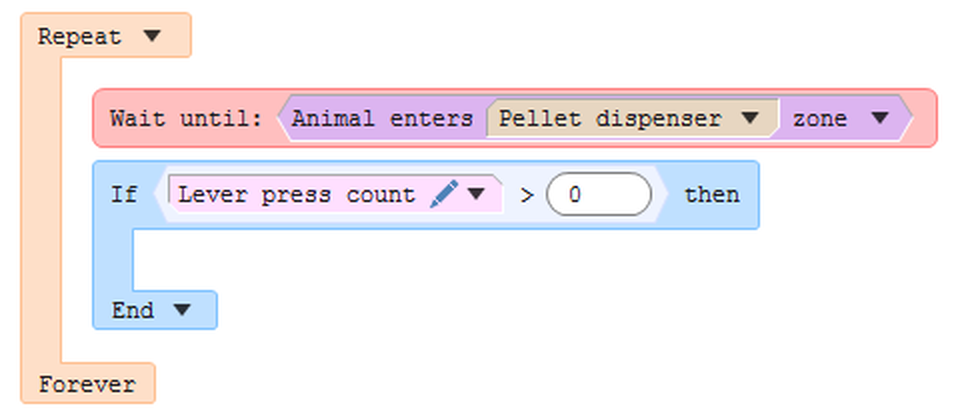
Figure 15. Entering the parameters to the 'greater than' operator.
What happens if the lever press count is greater than zero? We activate the pellet dispenser. This is done using an Action, so switch to the Actions tab. By default, only the test control actions are expanded, but you can right click and select the  Expand all option to see all the actions available. The pellet dispenser is a switch, so look for it under the Output switches heading; there are a number of actions available for this switch. Drag the Activate the switch action into the If statement in the procedure:

Figure 16. Dragging the Activate the switch action into the If statement.
If the animal hasn't pressed the lever, then the value of the 'Lever press count' variable will be 0. So what will happen then? As the procedure stands, the If statement will just drop through without taking any action, and will go back into the Repeat statement - i.e. it will wait for the animal to enter the pellet dispenser zone again.
Since that's not what we want (we want to activate the shock floor, if the animal hasn't pressed the lever), we need to add something to the If statement. You can do this using the little drop-arrow next to the 'End' part of the 'If' statement. If you click on this, you'll find that as well as the 'End' option, you also have the following choices:
| • | Else If - You can add as many 'Else If' conditions to the If statement as you like - each one will be evaluated in turn until one evaluates as true. If a condition is true, then the statements within this section of the If statement will run. If none are true, then the If statement will drop out of the bottom and do nothing (unless there's an 'Else' defined - see below). |
| • | Else - This allows you to define a sequence of statements to be run if none of the 'If' or 'Else if' conditions are true. If none of them are true, then the statements within this 'Else' section will run. |
Clearly, what we need to do is define an 'Else' section to this statement - if the 'Lever press count > 0' condition is not true, we need to activate the shock floor.
Select 'Else' from the drop-down list, which will create a second section to the If statement. On the Actions tab, find the Shockers heading and within it, the 'Shock floor' shocker. The first action in this list is to activate this shocker, so drag this action into the second half of the If statement as follows:

Figure 17. Dragging the 'Activate the shocker' action into the If statement.
We're nearly there, but there's just one thing we still need to do. As it stands, this procedure only needs the animal to activate the lever once, and then every time they enter the 'Pellet dispenser' zone they will get another pellet (even if they haven't activated the lever again). This is because the 'Lever press count' variable is only ever incremented, and never reset. To ensure that the animal must press the lever every time they want a pellet, we must reset the 'Lever press count' variable after the successful activation of a pellet.
The simplest way to achieve this is to select the Variables tab, then drag the 'Lever press count' variable below the 'If' statement, as follows:

Figure 18. Dragging the 'Lever press count' into the procedure, to reset it.
Of course, we need to provide the value to reset to, so click on the right-hand parameter of this Set value statement, and enter '0'. This leaves us with the following completed procedure:

Figure 19. The complete 'Pellet dispenser' procedure.
 | The resetting of the variable could also have been inserted immediately after the activation of the pellet dispenser; this would have exactly the same effect. |
To finish off, click the  Check for errors button to make sure that the procedure doesn't contain any errors.
Summary
This example has taken you through some of the more advanced features of procedures:
| • | Using multiple procedures |
| • | User-defined variables |
| • | If statements |
| • | Conditional operators |
There's much more available, but this should give you an idea of the flexibility and power that procedures can offer.
What next?
Looking at all the items under the tabs on the procedure editor window will show you all the options that are available, and you can find out more on all the building blocks available to a procedure in the Elements of a procedure topic.
Now that you've seen some of the ways that a procedure can use I/O, I suggest that you have a play around and see if you can get procedures to manipulate any I/O devices that you have. Use the details above, along with the tool tips for all the procedure items, to help you.
If you require any assistance with writing procedures for your specific experiments, please contact ANY-maze Support and we'll be happy to help.

© Copyright 2003-2026 Stoelting Co. All rights reserved
ANY-maze help topic T0463