ANY-maze Help > The ANY-maze reference > The Protocol page > The elements of a protocol > Testing > Procedures > Writing a procedure using the procedure editor
Writing a procedure using the procedure editor
![]()
Introduction
The ANY-maze procedure editor is used to write or edit a procedure. The editor appears to the right of the procedure settings pane when a new procedure is created, or an existing procedure is selected for editing.
The left-hand side of the procedure editor contains various lists of items that can be used in the procedure. These items are the building blocks of a procedure, and you just need to drag them into the right-hand side of the editor to form the procedure.

Figure 1. The ANY-maze procedure editor.
Writing a simple procedure
Rather than describe all the different aspects of a procedure, let's start by creating a very simple example. The concepts in this example will be useful for creating your own procedures, and hopefully it'll very quickly demonstrate both the power and simplicity of procedures.
For this example, let's say we have set up a water-maze experiment. There's a zone called 'Island', and we want to end the test when the animal enters the Island zone.
| If you've used Events and Actions in ANY-maze before, then you'll probably realise that this corresponds to a very simple Event (Animal enters the Island zone) and Action (End the test). In fact procedures use a very similar system - but can be much, much more powerful! |
If you want to work through this example yourself, you can do so using the example experiment 'Water-maze videoed experiment'. If you'd like to do this, open this example, switch to the Protocol page and select the ![]() Add item button from the ribbon bar. Select New procedure from the list, and on the procedure settings page, change the procedure name to 'Found Island'. (Don't worry about the fact that there's already a procedure there; this is just for the purposes of creating an example and won't be saved).
Add item button from the ribbon bar. Select New procedure from the list, and on the procedure settings page, change the procedure name to 'Found Island'. (Don't worry about the fact that there's already a procedure there; this is just for the purposes of creating an example and won't be saved).
| If your File page does contain the Open example experiment option, you may need to enable this feature on the Options page under Features for new users. |
Note that the name of the procedure that you've just entered is important - we'll find out why later on in this worked example.
So what do we need our procedure to do? Well, the first thing to do is try and describe what you want to happen as a series of simple steps, i.e.
| • | Wait until the animal enters the 'Island' zone |
| • | End the test |
Let's create a procedure that does this.
The first thing we need the procedure to do is to wait for something to happen. So, let's drag a Wait until block into the procedure:

Figure 2. Dragging a Wait until statement into the procedure
There are two things to note here:
| • | Firstly, the Wait until block is something called a statement. This is something that controls the flow of the procedure, and a procedure is made up of one or more statements. |
| • | Secondly, when we dragged the statement into the procedure, we dragged it to the bottom of the empty procedure, over the white area, and not the shaded area at the top. This is because these two sections actually represent different parts of the procedure - the shaded section will be run before the test actually starts, and the white bit will be run as soon as the test starts. Obviously the animal cannot enter the 'Island' zone before the test starts, which is why we've put it in the lower section of the procedure. |
So now the procedure is waiting for something, but we need to tell it what it's waiting for. Things that happen in a procedure are called Events, so let's select the Events tab:

Figure 3. The Events tab.
Here we can see a list of all the possible events that are available to procedures. This contains animal position and activity events, zone entries and exits, and any events related to I/O devices being used by the protocol. In this case, we don't have any I/O, but this example experiment does have a number of zones, including the 'Island' zone that we want, and the events for these zones are at the bottom of the list. The headings in the list of events can be expanded or collapsed, just by clicking on them, so we can easily collapse the events that we're not interested in:

Figure 4. Collapsing the events we're not interested in.
Now we need to use the mouse to drag the Animal enters Island zone event, and drop it over the purple 'hole' in the Wait until statement:
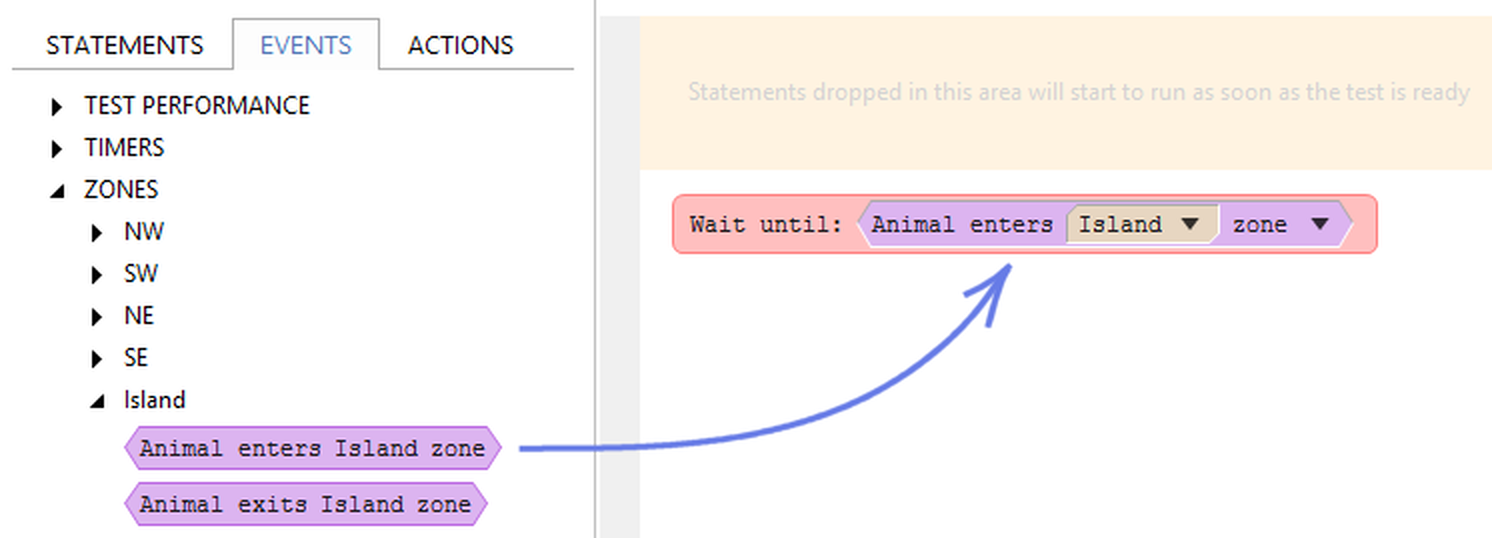
Figure 5. Dragging the event into the procedure.
Again, there are a couple of things to note here:
| • | The events are shaped with angled edges at each end; the 'hole' that we dragged it over had the same shape. In general, the ANY-maze procedure editor indicates what kind of object can be used in that space by the shape of its border. As you drag an item, a green outline will be shown over the places that it can be successfully 'dropped'. |
| • | The items that we've dropped into the procedure editor have little drop-down arrows at the right-hand side. These can be clicked on to show all the possible options that can be used here. So in our example, we can drop the arrow next to 'Island' to quickly and easily change the zone whose entry we want to wait for, or we can drop the arrow at the right-hand side of the event itself to select an entirely different event. This allows for quick editing of a procedure, without having to find the building block on the left-hand side and drag it into the editor. |
Now our procedure is waiting for the animal to enter the island zone, so next we need to tell it to end the test when that happens. Things that the procedure actually does that affect the test are called Actions, so we need to tell the procedure to take an action that will end the test. So we need to re-select the Statements tab, and this time, drag across an Action statement:

Figure 6. Dragging the Action statement into the procedure.
This is just the statement telling the procedure to execute an action, but we haven't yet told the procedure which action to execute. To do this, we need to switch to the Actions tab to see the available actions:

Figure 7. The Actions tab.
This tab will show you all the actions that a procedure can take to affect the test. This includes test control, actions to start/stop recording, and I/O outputs (if any have been set up in the protocol). Again, all the headings can be expanded to show you everything that's available. Full details of all these actions can be found under Actions available to procedures, but for now we can find the one we're interested in at the top of the list: End the test.
Again, note the shape of the actions - they're the same shape as the 'hole' in the statement we've just dragged into the procedure. So we can drag the End the test action into the procedure:

Figure 8. Dragging the action into the procedure.
An important point to note here is that every time a test ends, ANY-maze notes the reason for the test end. A test might end for one of a number of reasons - usually because the test duration elapsed, but it might also be because the user aborted the test, or (as in this case) because of a procedure action. These test end reasons can be used during analysis, for example, to include or exclude results from tests that ended for particular reasons. In this case, the test has ended because the animal found the island. When you use the End the test action, ANY-maze uses the name of the procedure as the test end reason. So you can see why, as I mentioned earlier, the name that you give the procedure is important!
| We'll see in the second worked example that you can generate your own test end reasons within a procedure, rather than relying on the name of the procedure. However that's slightly more complicated to set up, so if your procedure is relatively simple, it's best to just use the End the test action. |
Our procedure should now look like this:

Figure 9. The completed procedure.
As with the event that we dragged earlier, you'll see that the action has a little drop-down arrow at its right-hand side. Again, this can be used to quickly and easily change the action that the Action statement will use.
In fact, you might have noticed earlier that this arrow appeared even before we added the action to the Action statement (and the Wait until statement had one as well, before we dragged the event into it). We could just have used these arrows to select the event / action that we wanted, rather than dragging them across from the left-hand side.
There's just one last thing to do before we've finished. Procedures can get quite complex, and if there are any errors in a procedure, it won't run (you'll be told about this before you try to run any tests, and you'll need to fix any errors before starting any tests). You can check that your procedure is valid at any stage, by clicking the ![]() Check for errors button in the ribbon bar. The bar at the bottom of the procedure editor should show that there are no errors or warnings:
Check for errors button in the ribbon bar. The bar at the bottom of the procedure editor should show that there are no errors or warnings:
![]()
Figure 10. The bar at the bottom of the procedure editor, showing that there are no errors or warnings.
If you forget to check the procedure like this, don't worry - the procedure will be automatically checked for errors when you move to a different page, or select another item in the protocol list. If there are any errors that will prevent the procedure from running, you'll be told about it and given the chance to correct them.
Summary
To create a procedure:
| • | Creating and editing a procedure involves dragging 'building blocks' from the left-hand side of the editor to the procedure on the right. |
| • | The main 'building blocks' are called statements. These will run in order from top to bottom. |
| • | Statements contain different-shaped 'holes', into which can be dragged parameters of the relevant type. |
| • | Events and actions can be used in a procedure by selecting the relevant tab, and dragging the appropriate Event or Action into the relevant Wait until statement or Action statement, respectively. |
| • | Within the procedure, you can sometimes use the drop-down list on the procedure item as a shortcut to bypass this dragging. |
| • | Once you've finished writing a procedure, use the |
What next?
An example that introduces some more procedure concepts can be found in the topic Writing a more complex procedure.
For even more advanced concepts, such as using multiple procedures and working with I/O, see A worked example using I/O. It's probably a good idea to work through this example even if you don't have any I/O connected, as it introduces some more useful features of procedures.
If you require any assistance with writing your own procedures, please contact ANY-maze Support and we'll be happy to help.
See also:
| • | Elements of a procedure |
| • | Hints and tips for writing procedures |
| • | Re-using parts of procedures |
| • | Errors and warnings while writing a procedure |
![]()
© Copyright 2003-2026 Stoelting Co. All rights reserved
ANY-maze help topic T0461