ANY-maze Help > I/O devices supported by ANY-maze > Legacy I/O devices > The Parallel Rod floor test > Performing experiments with the Parallel Rod cage > Setting up a Parallel Rod floor test protocol
Setting up a Parallel Rod floor test protocol
![]()
Introduction
In this section, we're going to look at the steps involved in setting up a simple protocol for a Parallel Rod floor test. This can then be used as a basis for more specific protocols, depending on the requirements of your experiments.
As you may already know, protocols are fundamental to how ANY-maze works because it is the protocol which defines how an experiment will be performed. Even if you have never used ANY-maze before, you will probably get along fine just following though the steps in this section, but if you want to know more about protocols then a good place to start is this introductory tutorial on protocols.
| • | Creating an experiment |
| • | Setting the protocol mode and adding a Parallel Rod cage |
| • | Reviewing the Parallel Rod floor test protocol elements |
| • | Reviewing the default Parallel Rod floor test charts |
| • | Setting up stages and setting the test duration |
| • | Setting up fields to record additional information about your animals or tests |
| • | Saving the protocol |
Creating an experiment
Before you can do anything in ANY-maze, you need to open an experiment. In this respect ANY-maze is similar to Microsoft Word, where you can't do anything until you open a document. So the first thing you need to do is:
| 1. | Start ANY-maze. |
| 2. | On the opening page select New empty experiment from the list of protocols on the right side of the page. |
If ANY-maze is already running, simply switch to the File page and select New experiment from the list on the left.
Setting the protocol mode and adding a Parallel Rod cage
Now that you have an experiment open, you need to set the protocol mode and then add a Parallel Rod cage to the protocol.
The protocol mode defines which features of ANY-maze will be available; for example, in Parallel Rod mode, you only have simple 'On/off' I/O inputs to measure foot slips, so all other I/O elements will be turned off.
| 1. | Switch to the Protocol page by clicking the Protocol tab in the ribbon bar. |
| 2. | Click the first item in the list on the left of the page - this will probably be named 'Unnamed protocol'. |
| 3. | If you have a Parallel Rod floor test ANY-maze licence (which will usually be the case unless you already owned ANY-maze when you bought the Parallel Rod cage), then the protocol mode will already be 'Parallel Rod mode'. If it isn't, then open the protocol mode list and select this mode, as shown in figure 1. |
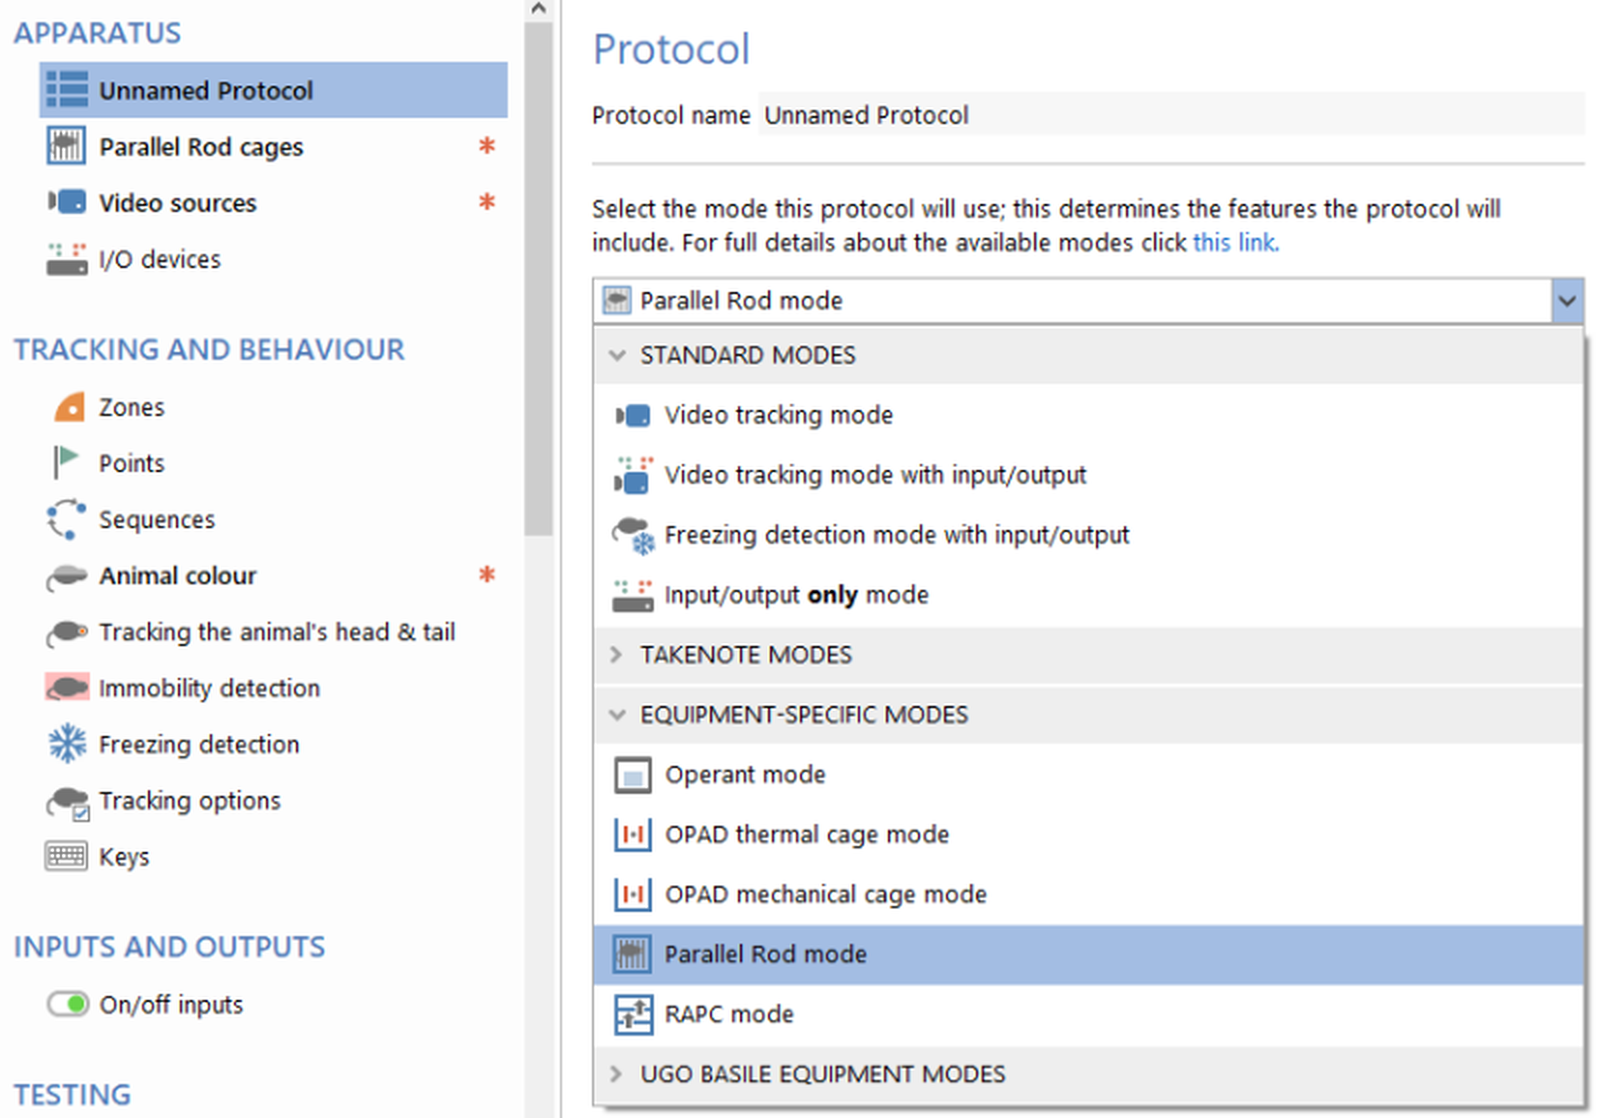
Figure 1. You should use the Protocol mode list to select the 'Parallel Rod mode' protocol mode.
| 4. | Next, we need to add our Parallel Rod cage to the protocol. This will tell ANY-maze which cage (or cages) we actually want to use. You can include up to 40 cages in an experiment, attached to different ANY-maze Touch switch interfaces - but for the purposes of this tutorial, we'll simply look at connecting the Parallel Rod cages attached to a single ANY-maze Touch switch interface. So, you now need to click the |
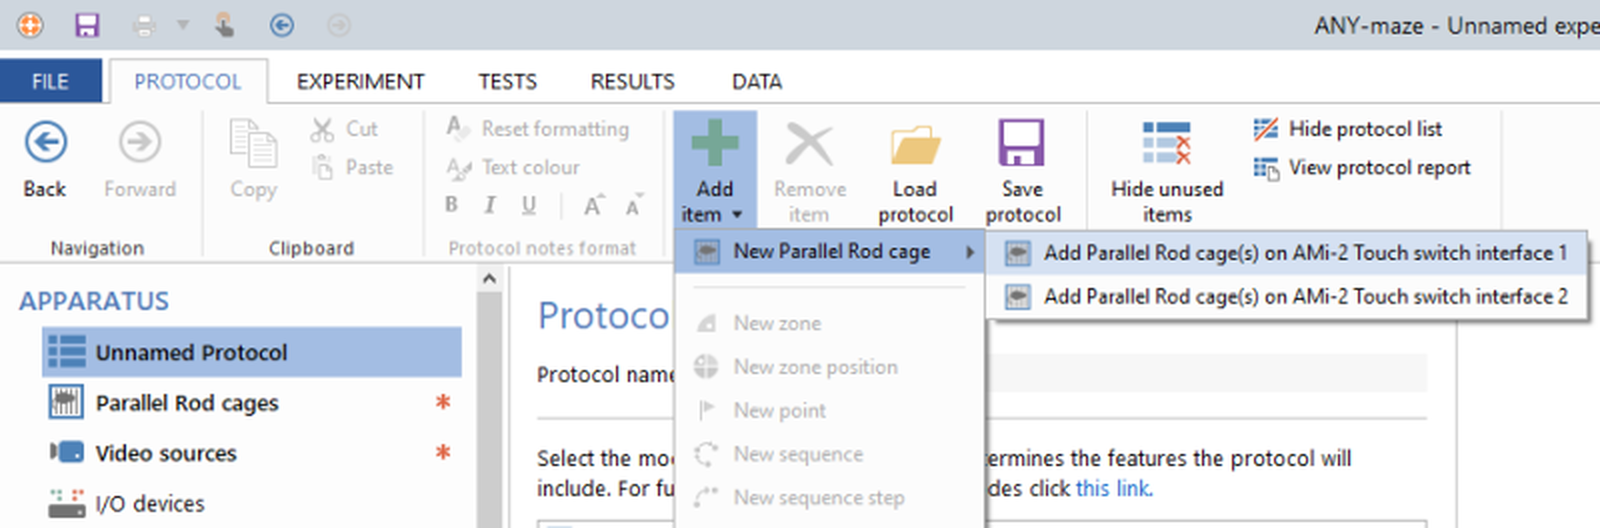
Figure 2. The New Parallel Rod cage... menu option allows you simultaneously add all the Parallel Rod cages attached to a single ANY-maze Touch switch interface.
| 5. | Selecting this option will open a settings window for the selected ANY-maze Touch switch interface - this will allow you to specify how many Parallel Rod cages are connected to this ANY-maze Touch switch interface, and how they will use any connected cameras: |
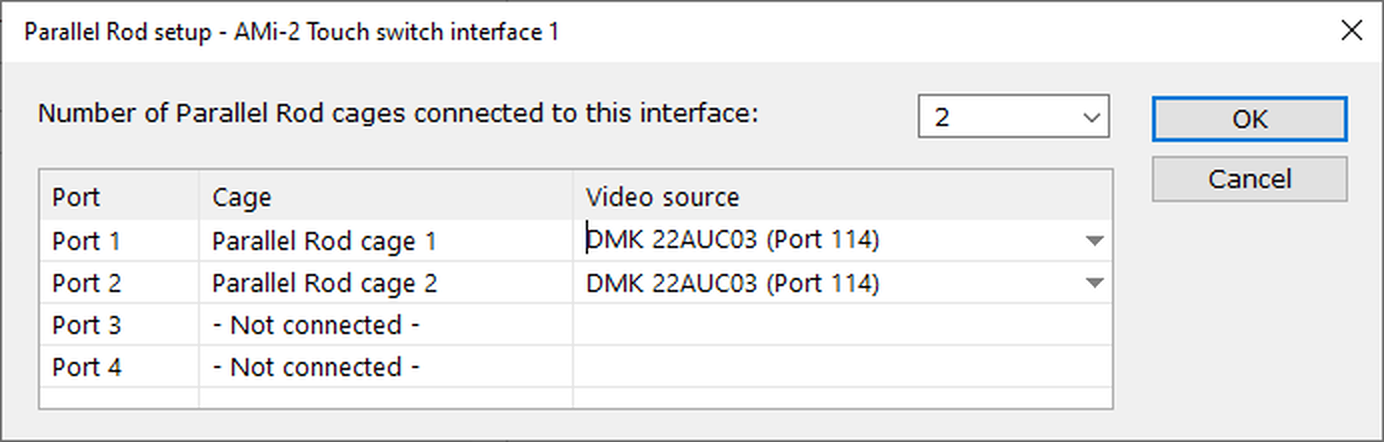
Figure 3. The Parallel Rod cage setup window allows you specify how many Parallel Rod cages are attached to this ANY-maze Touch switch interface.
This window allows you to specify how many Parallel Rod cages are attached to this ANY-maze Touch switch interface - this can be any number between 1 and 4. Simply select the number that are attached.
Once you've done this, you will see that the list of ports is automatically filled in with details of the Parallel Rod cage and the camera that ANY-maze thinks it will use - generally, a single camera can be used to view up to four apparatus and so if you've specified that more than one cage is connected, all these cages will be listed as using the same camera. This will probably be the camera that was supplied with the cage(s), but you should check that it is the correct camera before continuing. If you do have more than once camera connected, you can choose which camera is used for each Parallel Rod cage.
After selecting how many Parallel Rod cages are connected, and choosing the camera for each one, click OK - this will check that the entries you've made are valid (you can't leave the camera field empty, for example) and will then set up the protocol according to your entries.
| 6. | When you have added one or more Parallel Rod cage, it appears in the protocol list along with the video source for each apparatus, as in figure 4. |
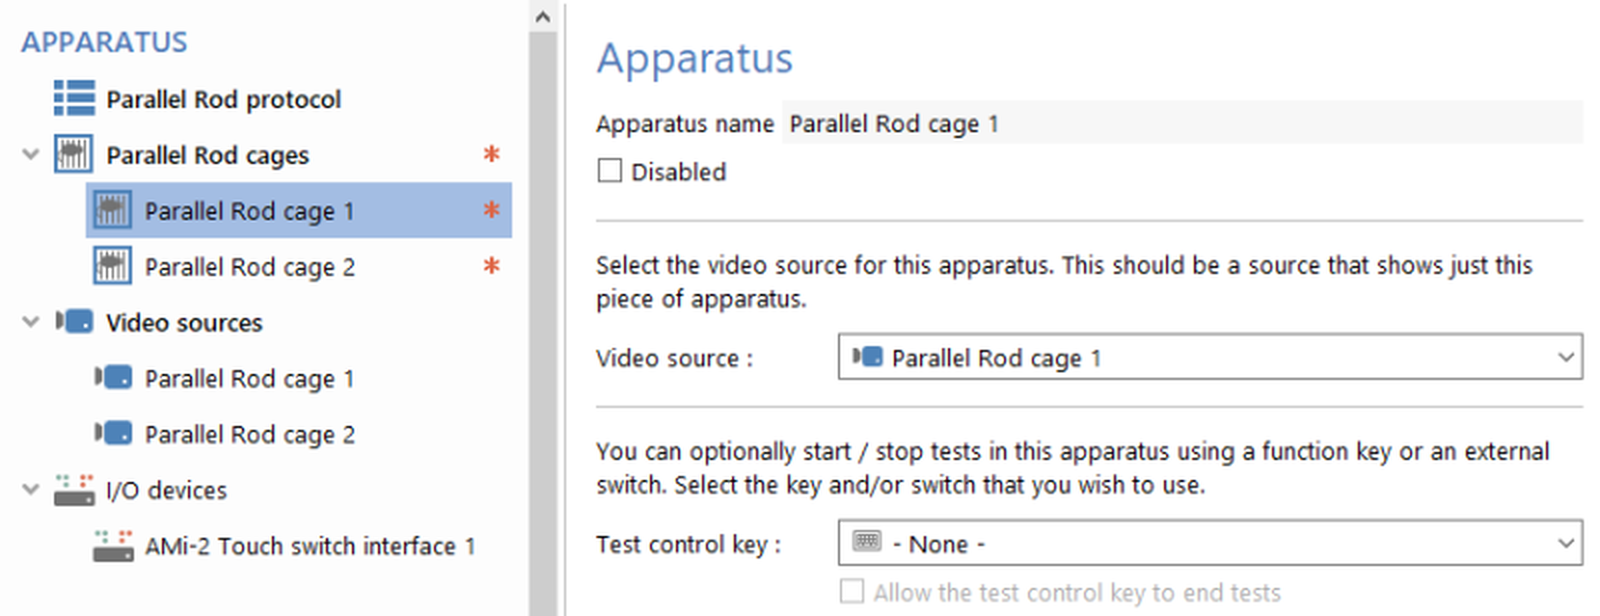
Figure 4. Parallel Rod cages and video sources are added to the protocol list.
| 7. | Selecting the cage's entry in the list causes its settings to be displayed in the settings pane to the right of the list; see figure 5. |
By the way, this is how the entire protocol works - you add things using the ![]() Add item button, they get included in the protocol list, and you can then select them and alter the settings in the settings pane.
Add item button, they get included in the protocol list, and you can then select them and alter the settings in the settings pane.
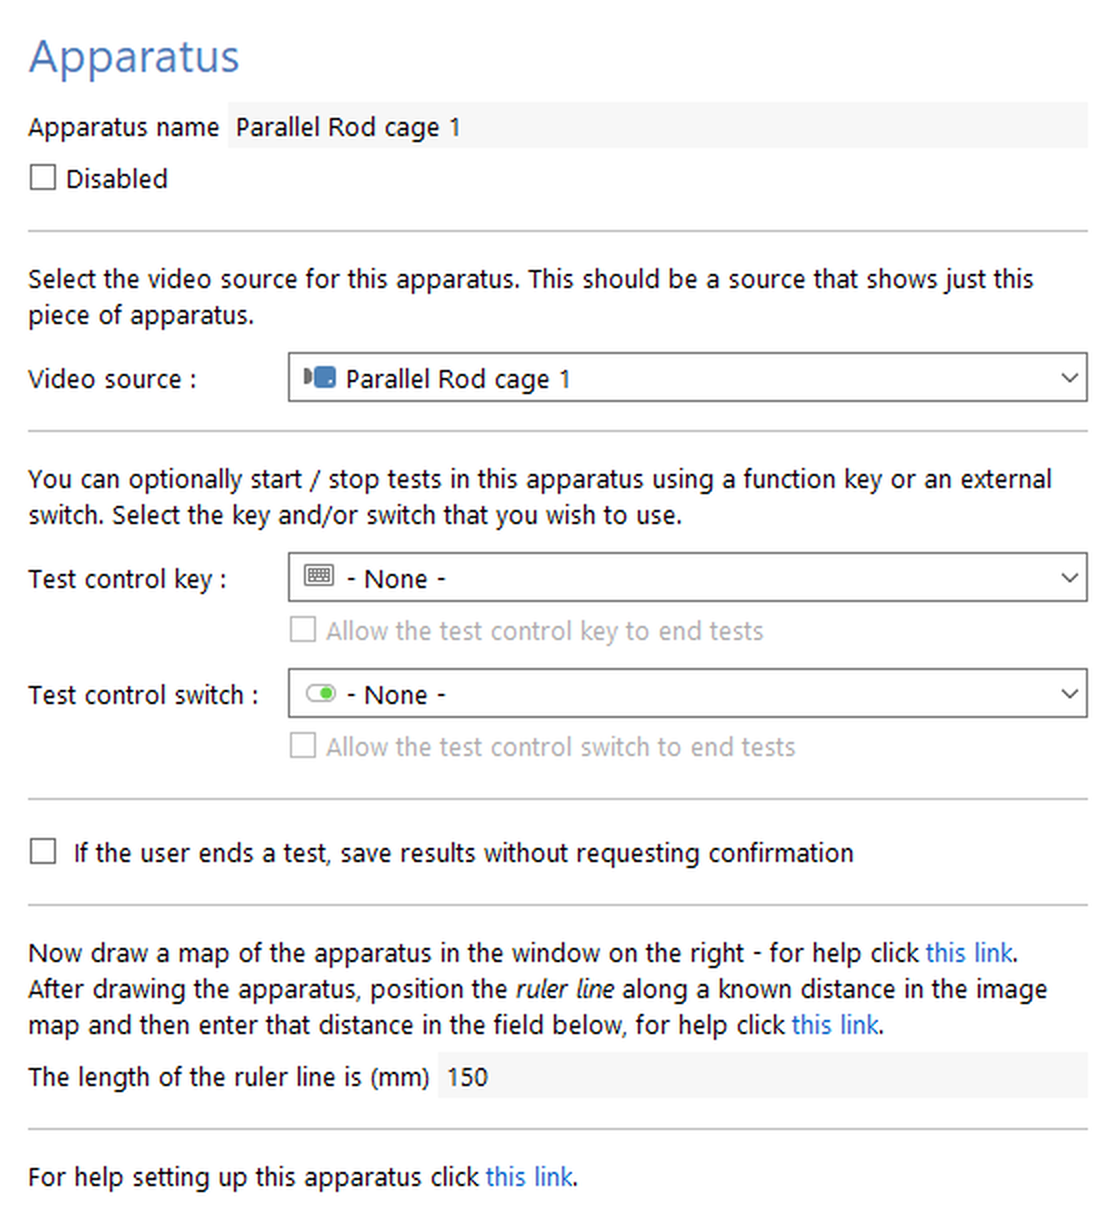
Figure 5. The Parallel Rod cage settings pane.
Once you've set up your Parallel Rod cage(s), you will be shown a message telling you what you need to do next - if you've only got one cage (or you're using a separate camera for each cage), then this will tell you to draw an apparatus map (see below). But if you're using a single camera for more than one apparatus, then you will firstly need to ensure that your video sources are set up correctly.
| 8. | When using a single camera over multiple cages, you will have multiple Video sources which all use the same camera - so for each Video source, you need to select a 'Region of interest' to tell ANY-maze which part of the image contains the view of the apparatus. ANY-maze will split each camera's image into four quarters by default, so all you need to do is look at each Video source in turn and check that the highlighted area (the 'Region of interest') for each Video source does actually show the apparatus that it's supposed to be looking at. It's important to be able to see the entire apparatus in this highlighted area, but with a small border around it - for full details on why this is important, see Selecting the area of a video picture which shows a piece of apparatus. |
| 9. | Once you've ensured that the Video source has a region of interest correctly selected (or it's a single Parallel Rod cage that doesn't need a region of interest), you need to draw an 'apparatus map' around the apparatus. You should find that when the Parallel Rod cage is selected, you can see a good view of the cage from above. |
Select the ![]() Rectangle tool button in the ribbon bar and then click on the top-left corner of the floor of the apparatus. Holding the mouse down, drag the rectangle to the bottom right corner of the apparatus - so you see an orange square which exactly covers the grid floor of the apparatus. This represents the apparatus in which ANY-maze will track the animal, so it's important that you enclose the whole area (but don't include any of the perspex wall of the apparatus, as that can contain reflections that confuse the tracking of the animal) - see figure 6.
Rectangle tool button in the ribbon bar and then click on the top-left corner of the floor of the apparatus. Holding the mouse down, drag the rectangle to the bottom right corner of the apparatus - so you see an orange square which exactly covers the grid floor of the apparatus. This represents the apparatus in which ANY-maze will track the animal, so it's important that you enclose the whole area (but don't include any of the perspex wall of the apparatus, as that can contain reflections that confuse the tracking of the animal) - see figure 6.
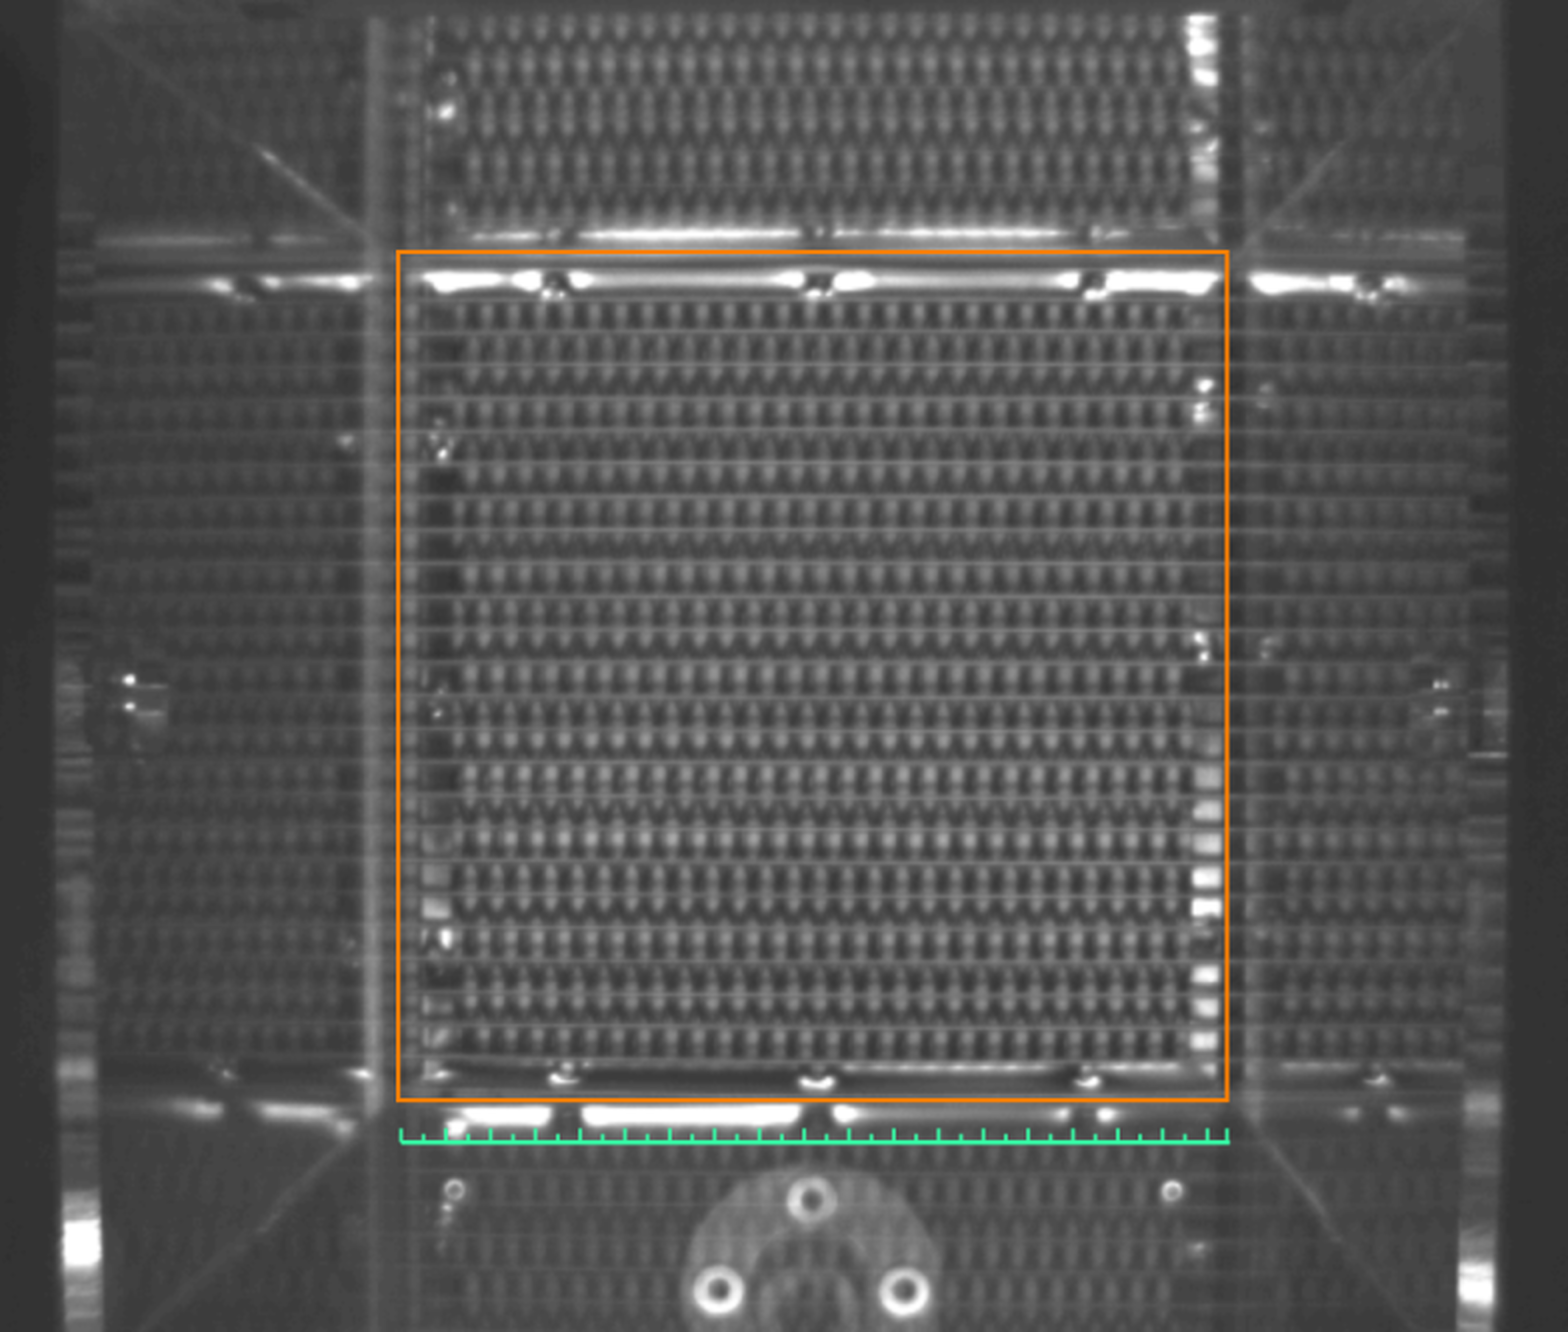
Figure 6. The apparatus map, drawn over the video image of the Parallel Rod apparatus
You'll notice that the "Length of ruler line" is already set to 200mm; this represents the length of one side of the Parallel Rod cage. You need to drag the green ruler line so that it lies exactly along one edge of the apparatus you've just drawn - it's easiest to do this along the bottom of the apparatus. This has already been done in the image above.
Reviewing the Parallel Rod cage inputs
Because ANY-maze already knows you are setting up a protocol for a Parallel Rod floor test (because that's the mode we put it into), it will automatically have added various elements to the protocol when we added the Parallel Rod cage. These elements are:
| • | An input for the 'Foot slip', i.e. a connection made between the grid and the floor of the Parallel Rod cage. You can see this by selecting On/off inputs in the protocol list. |
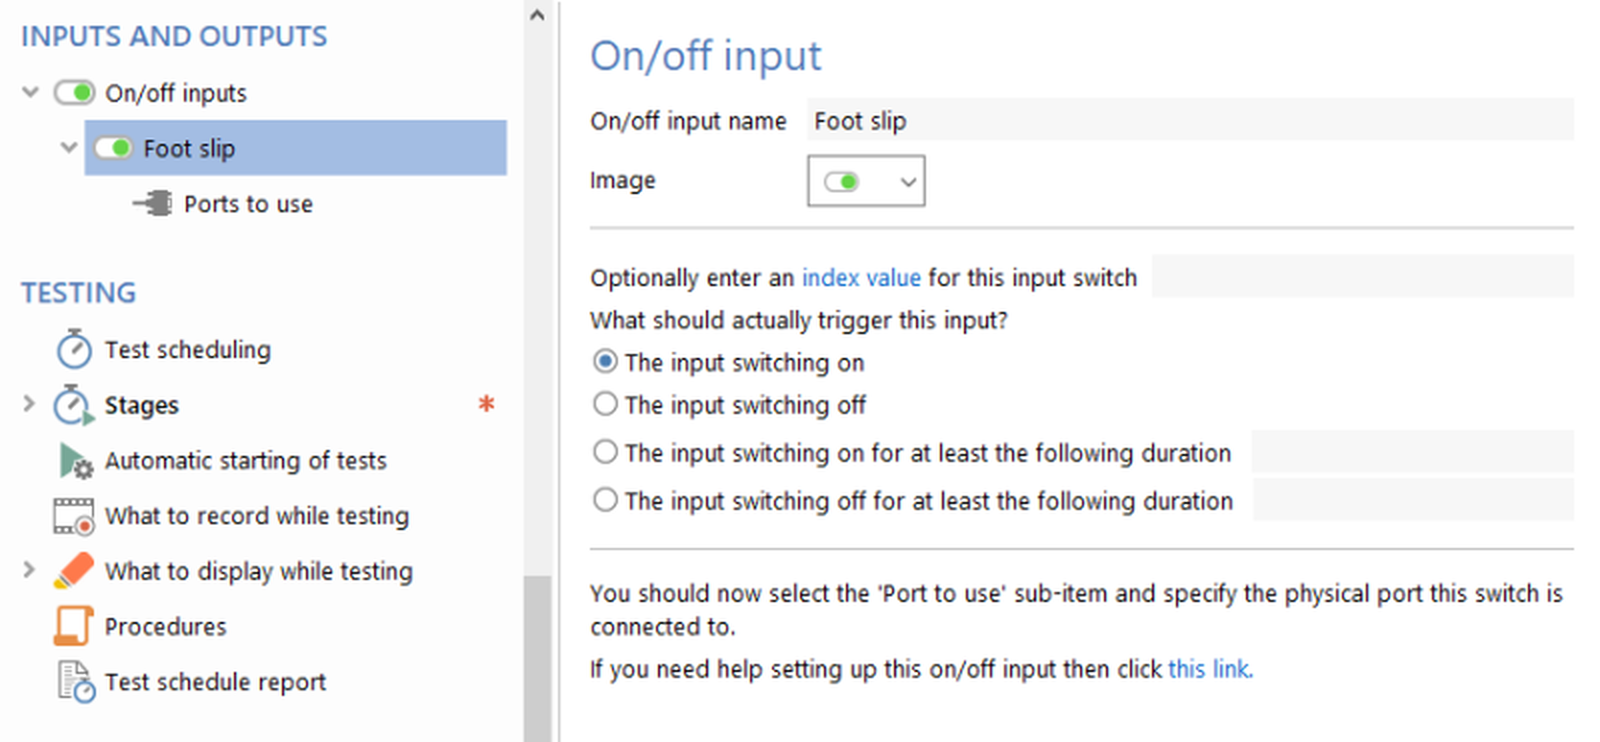
Figure 7. The Parallel Rod cage 'Foot slip' input is automatically included in the protocol list.
Note that if you have more than one Parallel Rod cage connected to a single ANY-maze Touch switch interface, you still see only one On/off input - ANY-maze will automatically deal with the fact that this single item is connected to a different ANY-maze Touch switch interface port for each Parallel Rod cage apparatus.
Reviewing the default Parallel Rod floor test chart
While a test is running in an Parallel Rod cage, you may want to see when a foot slip occurs. You'll see this on the I/O Status panel while the test is running, but you can also show it on a chart. ANY-maze will automatically include a chart of this in the protocol (although you can of course remove it if you wish).
You can see the charts that are included in the current protocol by selecting Charts in the protocol list - see figure 8.
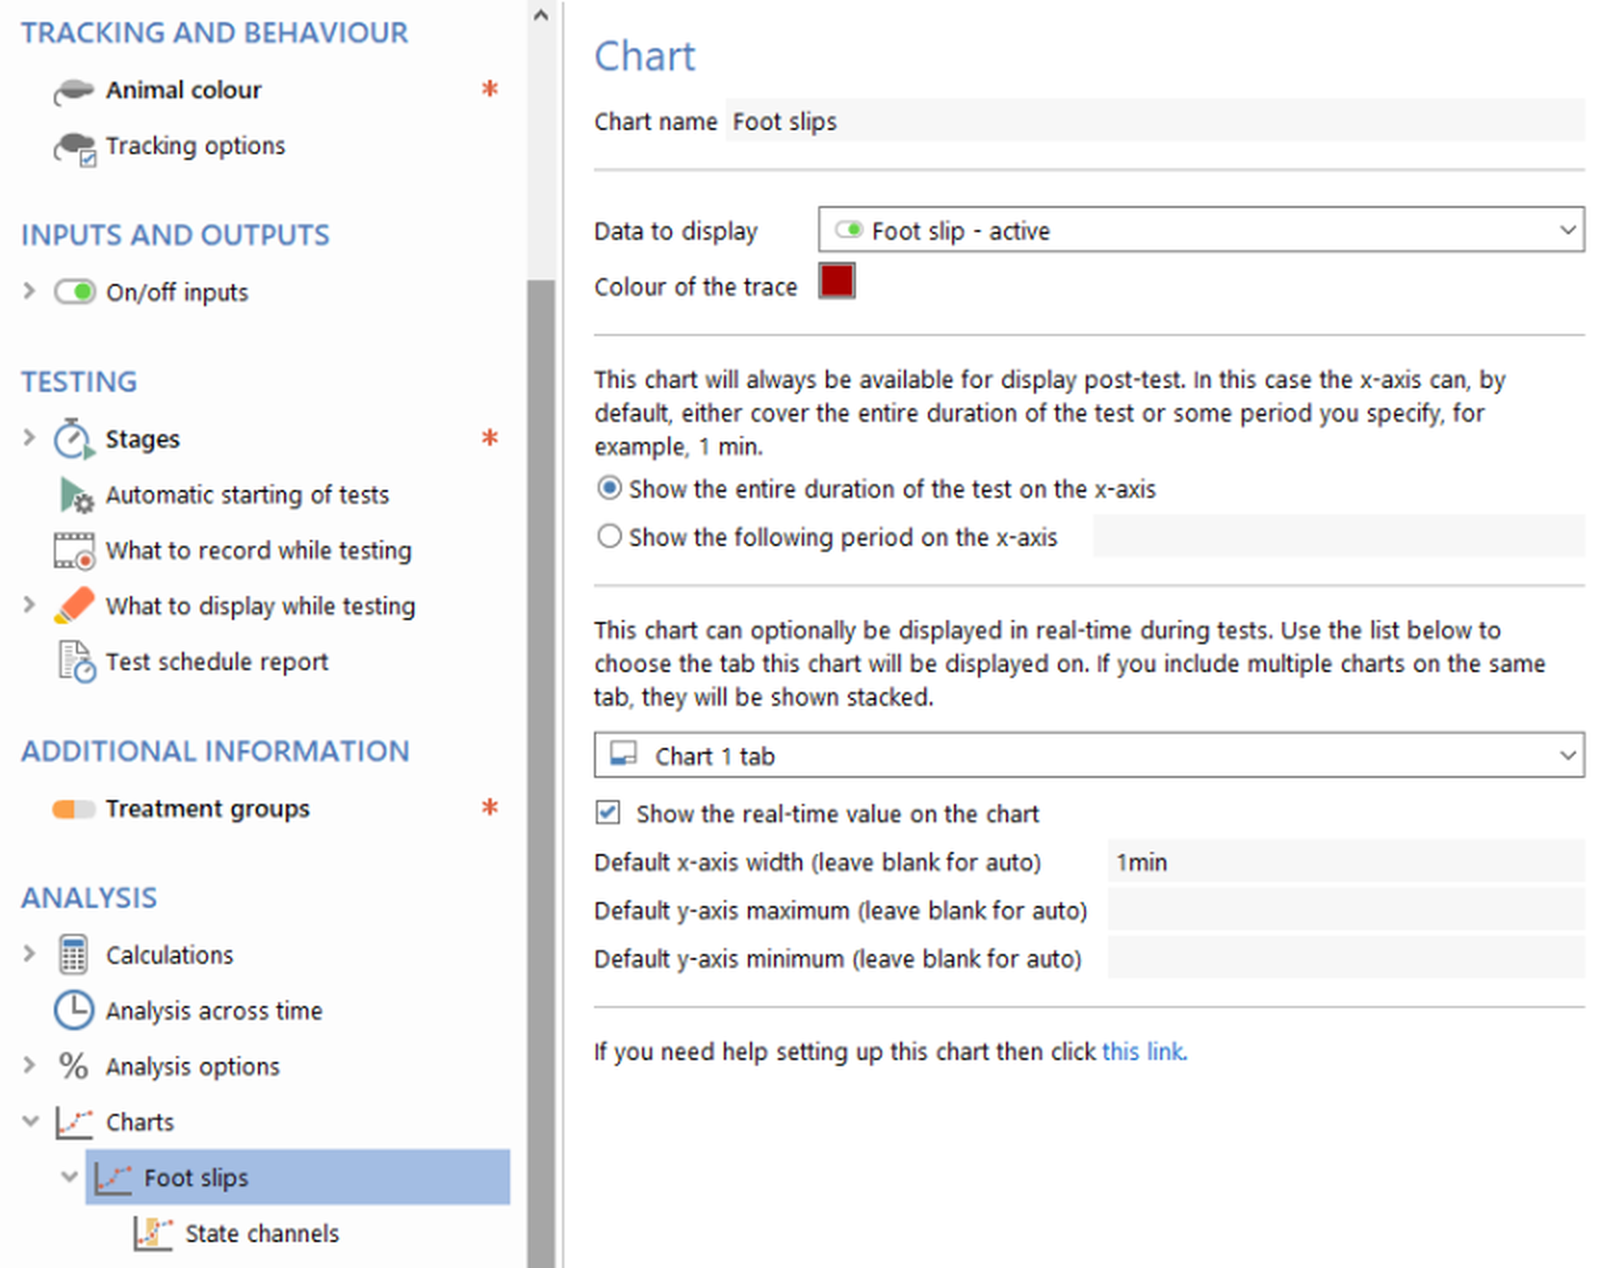
Figure 8. The chart that is included in a Parallel Rod floor test protocol by default.
Setting up stages and specifying the test duration
Another element that is automatically included in a Parallel Rod floor test protocol is a 'stage'. This is because ANY-maze requires that all protocols always include at least one stage, and the Parallel Rod floor test is no exception.
A stage is simply a test (or a group of tests) that you perform on your animals. In many cases, an experiment will simply have one stage consisting of one test (for each animal) and that is the default setting for Parallel Rod floor test. Of course, you can change this if you wish. For example, you might have two stages in your experiment; in the first stage you test the animals without any treatment, while in the second stage you treat them and then test them again. In this case you would simply need to add a second stage to the protocol.
To see the stage select Stages > First stage in the protocol list; the Settings pane will then show the stage's settings, as in figure 9.
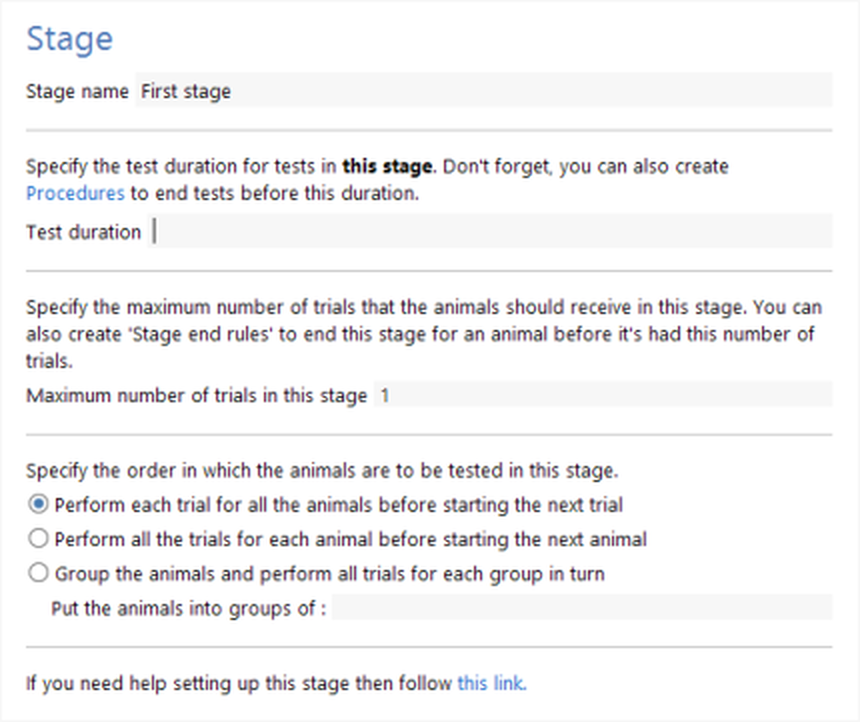
Figure 9. The default settings for the first stage in a Parallel Rod floor test protocol
Full details about stages can be found here, but suffice to say that it is in the stage's settings that you specify the duration of your tests. As can be seen in figure 9, ANY-maze does not include a default duration, so you will need to set this value before you can actually perform any tests.
As you will see, Stages are part of the Testing group in the protocol list, and this group includes various other options which I'll briefly describe now:
| 1. | Automatic starting of tests: In the Parallel Rod floor test cage, it is usually best to start tests automatically - so you should leave this option switched ON (as it is by default). |
| 2. | What to record while testing: If you wish you can record a video of your tests, which will occur simultaneously to the tracking and foot slip detection. |
| 3. | What to display while testing: There are a range of options for what should be displayed while a test is running - you may wish to show the I/O Status by default (which will show you current state and count of foot slips), or to show this information in a chart. |
Setting up fields to record additional information about your animals or tests
| This step is optional |
If you wish, you can set up 'fields' in your protocol to record additional information about your animals or tests. For example, you may be keen to differentiate between how male and female animals respond, in which case you will presumably want to record their Sex somewhere. Of course, you could just note this on a piece of paper, but instead you could set up a 'Sex' field and record the data within ANY-maze. Not only would this mean that all the data relating to the experiment would all be in one place, but you could also then use ANY-maze's analysis features to analyse the animals' sex - perhaps to check that there is no significant difference between male and female animals.
You can create any number of fields, and they can be used as either independent or dependent variables in analysis. Full details about fields and how to set them up can be found here.
Save the protocol
You may have noticed that other than adding the Parallel Rod cage to the protocol, we haven't had to add, or even edit, anything else. Nevertheless, you may want to alter the default settings a little. This being the case, you will usually want to save the protocol so you can use it again in other experiments. To do this, you need to click the ![]() Save protocol button in the ribbon bar.
Save protocol button in the ribbon bar.
What next?
In this topic, we created a simple Parallel Rod floor test protocol. Now that we have this set up, we are ready to move on to the next topic of this tutorial - Running tests in a Parallel Rod cage.
See also:
| The topics listed below are general topics relating to ANY-maze and may refer to features not available or required with the Parallel Rod floor test. |
| • | An introductory tutorial on protocols |
| • | The elements of a protocol |
| • | Adding elements to a protocol |
| • | Editing the elements of a protocol |
| • | Deleting elements from a protocol |
| • | Saving and loading protocols |
| • | Viewing the protocol report |
![]()
© Copyright 2003-2026 Stoelting Co. All rights reserved
ANY-maze help topic T1248