ANY-maze Help > I/O devices supported by ANY-maze > Ugo Basile instruments supported by ANY-maze > The Ugo Basile Fear Conditioning Cage > Using an Ugo Basile Fear Conditioning cage in experiments
Using an Ugo Basile Fear Conditioning cage in experiments

Introduction
The Ugo Basile Fear Conditioning cages provide a complete system for performing either contextual or cued fear conditioning experiments in mice or rats. In this topic, I will outline the steps required to set up and run a typical cued fear conditioning experiment. Each step includes links to specific topics which provide detailed instruction.
 | You may find it easiest to print this topic and then follow the instruction on the printed output. |
Prerequisites
In this topic, I will assume that the Fear Conditioning cage(s) have already been set up and tested, and that you are broadly familiar with the general structure and design of ANY-maze.
If you're new to the system, then I recommend taking the brief introductory tour before continuing. (The tour is not targeted at fear conditioning experiments, but most of what it describes is relevant and taking it will help you to learn your way around the software.)
Overview
The plan is to set up a simple cued fear conditioning experiment in which the tests will be performed as follows:
| • | Lights in the cage will be on at 40lux throughout the test |
| • | White noise in the cage will be on throughout the test |
| • | 2 minutes after the test starts, a 4KHz tone will be played for 3 seconds |
| • | Immediately after the tone stops, a shock of 0.5mA will be administered for 1 second |
| • | 4 minutes and 6 minutes after the test starts, identical tones and shocks will occur |
| • | The test will end after 7 minutes |
| • | Freezing behaviour will be assessed throughout the tests |
Setting up the protocol
Setting up a protocol can seem like a complicated task, especially if you are new to ANY-maze, but it's actually not too complex; you just work your way through the protocol 'elements', adding those that you need. And the best thing is that after you have created a protocol, you can save it and reuse it in multiple experiments.
So let's get started. The first you will need to do is to create a new experiment:
| 1. | Start ANY-maze - the program will open and will display the Startup page. |
| 2. | Click the New empty experiment document shown in the list on the right side of the page. |
| 3. | Switch to the Protocol page. |
| 4. | In the protocol list, the Protocol element will already be selected. To the right of the protocol list, in the settings pane, there is a drop-down list for setting the Protocol mode. Open the list and select Ugo Basile Fear Conditioning Cage mode. |
In this mode, ANY-maze will detect when the animals freeze, but it won't track them. If you want to track the animals (as well as detecting freezing) then you should select Video tracking mode with input/output. (Note that the availability of this mode will depend on the licence that you have purchased).
More details about the protocol modes can be found here.
Next, we need to tell ANY-maze how it should assign the animals in our experiment to their treatment groups. Don't worry too much about this at this stage; it should become clearer as we proceed, so for now just:
| 5. | Click the Treatment groups element in the protocol list |
| 6. | In the settings pane, to the right of the protocol list, click the option The user will manually assign the animals to their treatment groups |
Next, we need to tell ANY-maze about the Fear Conditioning cages that we will be using:
| 7. | Click the  Add item button in the ribbon bar and select New Fear conditioning cage from the menu which appears. A sub-menu will open where you will be able to add either the individual cages connected to your computer or all the connected cages - select the option to Add all connected Fear conditioning cages. Add item button in the ribbon bar and select New Fear conditioning cage from the menu which appears. A sub-menu will open where you will be able to add either the individual cages connected to your computer or all the connected cages - select the option to Add all connected Fear conditioning cages. |
| 8. | The Fear conditioning protocol wizard will open - see figure 1. |

Figure 1. The Fear Conditioning protocol wizard
| 9. | The Fear conditioning protocol wizard takes you through a series of pages where you will enter information about how you want to use your Fear conditioning cages in your experiment. For example, one of the pages - shown in figure 2 - asks you about how you want to use Sounds. |
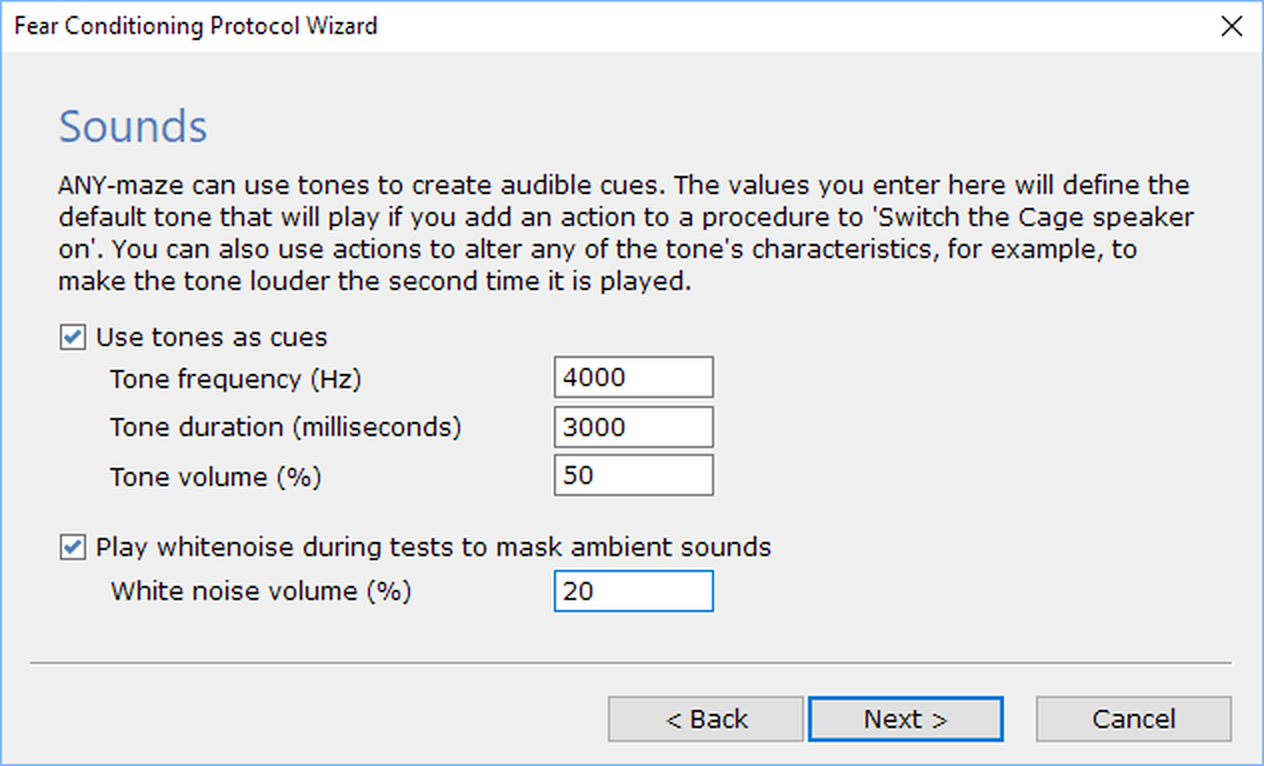
Figure 2. The 'Sounds' page of the Fear Conditioning protocol wizard.
The questions are quite straightforward and you can always edit any of your answers at any time, even after you have completed the wizard. So here you should answer the questions based on the specification we have for our tests - specifically:
| • | Lights in the cage will be on at 40lux throughout the test |
| • | White noise in the cage will be on throughout the test |
| • | We'll use a 4KHz tone, played for 3 seconds, as a cue |
| • | We'll use a 0.5mA shock of 1 second duration |
| 10. | When you get to the end of the wizard, ANY-maze will use your answers to automatically create lots of protocol items for you. For example, it will add Speaker items for the sounds you want to use - one for tones and one for white noise (if you chose to use both). |
The items will be set-up based on the answers you gave the wizard, but you can select any item in the protocol list and edit it, if you wish. For example, if you told the wizard that you wanted a cue tone to be played for 5 seconds and now you've changed your mind and you'd like it to be played for just 3 seconds, then you could select the 'Cage speaker' item in the protocol list and edit the play duration.
Although the wizard will have populated most of the protocol for you, there are still some additional steps that you need to perform:
| 11. | You need to select each of your cages, under the Fear conditioning cages group in the protocol list, and for each one, in the 'image' pane on the right-hand side of the page, use the  Rectangle tool Rectangle tool (shown in the ribbon bar) to draw around the base of the cage. ANY-maze will only detect freezing within the area that you draw, so you should avoid including areas which the animal simply can't get to. Rectangle tool Rectangle tool (shown in the ribbon bar) to draw around the base of the cage. ANY-maze will only detect freezing within the area that you draw, so you should avoid including areas which the animal simply can't get to. |
An introduction to Apparatus can be found here.
Full details about setting up apparatus can be found here. Note that this topic describes all the steps required when setting up apparatus for video tracking; since we are only using 'Freezing detection' mode, we only need to draw the outline of the apparatus (as in step 18, above)
At this point you've set up all the equipment-related parts of the protocol. Next, we need to specify that the test duration will be 7 minutes.
| 12. | In the protocol list select Stages > First stage. |
| 13. | In the Settings pane, under Test duration, enter '7min'. |
Stages provide a mechanism for creating experiments in which animals will be tested repeatedly. For example, your experiment might include a 'Habituation' stage and a 'Retest' stage. In fact, a stage can itself include multiple tests - for example, the animals may have two trials in the 'Habituation' stage (perhaps on two consecutive days) and four trials in the 'Retest' stage (perhaps with just 30 minute intervals between them).
An introduction to stages can be found here.
Full details about setting up stages and trials can be found here.
As you will see, Stages are part of the Testing group in the protocol list, and this group includes various other options which I'll briefly describe now:
| 14. | Automatic starting of tests: In the fear conditioning cages, it is usually best to start tests manually - so you should switch this option OFF (it is on by default). |
| 15. | What to record while testing: If you wish you can record a video of your tests, which will occur simultaneously to the freezing detection. |
| 16. | What to display while testing: There are a range of options for what should be displayed while a test is running - you may wish to switch on the options to show when the 'Cue tone' and 'Floor shock' are active (although this only makes sense if you choose not to show charts of these outputs; see next section). |
Although by no means required, it can be useful to display charts during a test to show when the animal is freezing and to show the state of the 'Cue tone' and 'Floor shock'. This just provides you with a visual indication that freezing is being detected, and that the tone and shock are occurring at the required times. If you wish to include charts, then here's what you need to do:
| 17. | Add a new Chart to the protocol |
| 18. | Call the chart 'Freezing' |
| 19. | In the Data to display drop-down list, select 'Freezing' |
| 20. | Select the option to Display the chart in real-time during tests |
| 21. | Repeat steps 46 to 49 for the cue tone and for the shocker; so for one chart select 'Cue tone - active' as the Data to display, and for the other select 'Floor shock - active'. |
An introduction to charts can be found here.
Full details about setting up charts can be found here.
Finally we reach the point where we need to specify when the tone and shock should occur. To do this, we will use a procedure. As you may recall, every 2 minutes we want to play a 4KHz tone for 3 seconds, immediately followed by a shock of 0.5mA for 1 second. Here's what you need to do:
| 22. | Add a new procedure to the protocol. |
| 23. | Call the procedure '2 minutes repeating'. |
| 24. | Drag a Repeat... statement from the left side of the procedure editor into the right side (drop it in the white area, NOT the orange shaded area at the top). |
| 25. | Select the Events tab in the procedure editor. |
| 26. | Drag a Timers > Time elapsed event into the right side of the procedure editor and drop it inside the Repeat statement. Type a value of '2min' into the time elapsed field. |
| 27. | Select the Actions tab in the procedure editor. |
| 28. | Drag the Speakers > Cue tone > Switch the speaker on action into the right side of procedure editor and drop it below the 'Wait until time elapsed' statement. |
| 29. | Select the Events tab in the procedure editor. |
| 30. | Drag the Speakers > Cue tone > Cue tone stopped playing event into the right side of procedure editor and drop it below the 'Action: Switch the cue tone on' statement. |
| 31. | Select the Actions tab in the procedure editor. |
| 32. | Drag the Shockers > Floor shock > Activate the shocker action into the right side of procedure editor and drop it below the 'Wait until cue tone stopped playing' statement. |
That's it. You should have a procedure that looks like the one in figure 3.
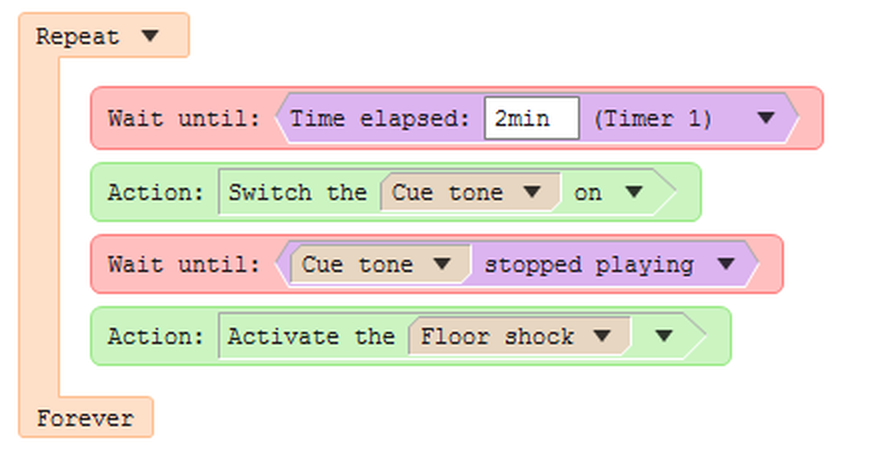
Figure 3. A simple procedure to play a tone, immediately followed by a foot shock, once every 2 minutes
In fact this procedure doesn't do exactly what we want, as it will wait for 2 minutes before playing the tone for the first time, but will wait 2 minutes and 3 seconds on all subsequent occasions (as it will first wait for the tone to stop playing, which takes 3 seconds to occur and then wait 2 minutes after that). This is easy to resolve - you could add a wait of 3 seconds before the Repeat statement, and change the wait inside the repeat statement to be '1 min 57s' - if you follow through the logic, you'll see that the tone will then always start at exact 2 minute intervals.
Full details about procedures can be found here.
That concludes the steps required to create a protocol to implement the test procedure that I described at the start of this topic. I appreciate that it seems like there are a lot of steps to perform, but once you become familiar with ANY-maze you'll find that you can create protocols quite quickly and, as I mentioned at the start, you can save protocols and reuse them in multiple experiments. In fact, let's save this protocol now:
| 33. | Click the  Save protocol button shown just above the protocol list. Save protocol button shown just above the protocol list. |
| 34. | A standard Windows 'File save' window will open - give the protocol a name and choose where it should be saved. |
In the future, you can load this protocol either by selecting it on the Startup page or by switching to the Protocol page and clicking the  Load protocol button.
Setting up an experiment
In the previous section we created a protocol for our fear conditioning experiment. As you may have noticed, this described the way in which the experiment will be performed but it didn't include any details about the animals we will be testing. This is deliberate, as the protocol is generic and can be applied to different experiments (using different animals), so what we need to do now is set up the actual experiment we plan to perform.
Let's assume we want to test 20 animals in two groups. One group will be treated with saline and the other group will be treated with a drug.
Here's what you need to do:
| 1. | If you have just completed the steps in the previous section, then the protocol is already set up. If not, then switch to the File page, select New experiment and in the list of protocols shown on the right side of the page, click the protocol you created in the previous section. |
| 2. | Switch to the Experiment page. |
| 3. | On the left side of the page, enter a title for your experiment. |
| 4. | On the right-hand side, for Treatment 1, enter a name of 'Saline' and an N of '10'. |
| 5. | For Treatment 2, enter a name of 'Drug' and an N of '10'. |
You may recall that when we set up the protocol, one of the first things we did was to specify that The user will manually assign the animals to their treatment groups and that I mentioned that the meaning of this would become clearer later on - well, now is that time. What we've just done is to add 2 treatment groups and 20 animals (10 per group) to the experiment, but which group should animal 1 be part of? It might seem obvious to say that animals 1-10 are in the 'Saline' group and animals 11-20 are in the 'Drug' group; but ANY-maze tests animals in number order, so this would mean that all the Saline animals would be tested first, followed by all the Drug animals, which probably isn't what you want. In fact, by selecting the option to manually assign animals to their treatment groups, what you have done is to tell ANY-maze not to automatically place the animals in any treatment groups, but rather to leave it to you to do this - and that's what we're going to do now:
| 6. | Still on the Experiment page, click the  View animals button in the ribbon bar. The right-hand side of the page will change to show a table of animals, rather than a table of treatments. View animals button in the ribbon bar. The right-hand side of the page will change to show a table of animals, rather than a table of treatments. |
| 7. | In the table of animals is a column for the animal's treatment. Here you can type the 'treatment code' of the treatment that the animal should receive. Treatment codes are simple one letter codes which the system will have assigned to the treatments you entered, so in this case one treatment will be A and one will be B, but you won't know which is which; this is deliberate as you're running the experiment blind. So, you can simply enter 'A' or 'B' into the treatment column for each animal to assign them to their groups. If you want to know which treatment is which, then you should click the  Reveal treatment coding button - but think carefully first, as you'll then know which treatment each animal will receive and the experiment will no longer be blind. Reveal treatment coding button - but think carefully first, as you'll then know which treatment each animal will receive and the experiment will no longer be blind. |
More information about entering general experiment details can be found here.
More information about setting up treatment groups and animals can be found here.
Performing the tests
We're now ready to perform our experiment:
| 1. | Switch to the Tests page. |
| 2. | On the left side of the page, the Test schedule report will be displayed. This report lists all the tests that you will perform, together with: the animal that the test will be performed on, the Cage the test will be performed in, the treatment the animal is to receive and the status of the respective tests. |
| 3. | On the right-hand side of the Tests page, you will see video images of the two Fear Conditioning cages. Above the image of Cage 1 is a line that says 'Cage 1: Animal 1 - Ready...'. You should get animal 1 (let's assume you already applied the treatment), open the door of the cage, place the animal in the inner cage and close the door. If you remember, one of the options we had when we set up the apparatus was to use the door switch as a way to control the test. If you selected this option, then when you close the door the test will begin. Otherwise you can start the test by clicking the  button shown above the video picture, or by pressing the 'F' key that you specified as the test control key for this apparatus. button shown above the video picture, or by pressing the 'F' key that you specified as the test control key for this apparatus. |
| 4. | The test in Cage 1 will now be running. You should see the word 'Freezing' displayed at the top-right of the video image whenever ANY-maze detects that the animal is freezing, or if you chose to include a chart of the freezing episodes, you will see this in the chart. |
| 5. | You can then run the test in Cage 2, in the same way. Note that the two tests are independent, so you could start the test in Cage 2 before the one in Cage 1, and you can end or pause one test without affecting the other. |
| 6. | After a test has run for 7 minutes, it will end automatically and you should remove the animal from the cage. |
| 7. | Continue working through the tests, as shown in the Test schedule report, until you have performed them all. Note that you don't have to run all the tests in one 'batch'. For example, you could run tests 1 to 4 and then save the experiment, close ANY-maze and shutdown your computer. Tomorrow when you reopen the experiment you'll be in exactly the same place as you left off, and you can simply continue running the tests. |
The above instructions assume everything runs smoothly, but what happens if, for example, you mis-dose an animal, or you test animal 3 instead of animal 2, or an animal seems to be unwell and you want to skip its test? Answers to all these questions, and many more, can be found here.
Analysing results
There are many different ways that people analyse the results of Fear Conditioning experiments, and providing step-by-step instructions for just one of them is unlikely to be very helpful. Instead, I will simply provide an overview of the results analysis options that are available to you.
| • | It is common in Fear Conditioning experiments to divide tests across time into equal length time bins, and to analyse freezing in each bin. ANY-maze includes two ways you can do this: using Time segments (which are equal length periods analogous to time bins) and using Time periods which define specific periods in the tests, for example, the period from 2 minutes to 2 minutes 40s. The advantage of time periods is that you can 'pick' periods from any moment in the test, whereas time segments always divide the test into equal length bins and always start at time 0. On the other hand, time segments are quicker to set up. Both Time segments and Time periods are described in full detail here. |
| • | Result values that are typically of interest in fear conditioning are 'Number of freezing bouts' (usually analysed within each time bin), 'Latency to first freezing bout' (again usually as latency from the start of the time bin) and 'Total time freezing' (in each time bin). All these results are available within ANY-maze, and can be viewed (collated by treatment group) on the Results Page. In fact the Results page can also display graphs of the collated data and even perform statistical analysis of the results. |
| • | If you wish to export the results of tests to other programs (such as Excel or SPSS) for further analysis, then the best option is to use the Data page. This lists the results of tests (or time bins) in a spreadsheet format, and you can simply select areas of the sheet (or all of it) and copy-and-paste them into other programs, or save them in a range of common file formats. |
| • | If you want to see more detailed information, for example, if you would like to see a list of all the freezing bouts in a test, then you can do so using the Test data report which can show everything that happened in a test in a spreadsheet format with time running down the rows. |
| • | You can chart the things that happened in a test - for example, you could chart the application of the cue tone, the application of the shock and the moments that the animal is freezing - which would probably provide a clear graphical indication of the effect of the test. |
| • | Finally, you may find yourself wanting to generate some new result value from those that ANY-maze already includes. For example, you might want to know the 'Mean freezing bout duration' in each time bin. ANY-maze doesn't report this, but it does report the 'Total time freezing' in a time bin and the 'Number of freezing bouts' in the time bin, so the 'Mean freezing bout duration' would simply be the former divided by the latter. You could of course transfer the results to Excel and calculate this new value there, but better would be to include this Calculation in your protocol. Then the result would be available within ANY-maze, and could be analysed just like any other result. Calculations can be used for more sophisticated things than just calculating a simple average; full details of the features they include can be found here. |
That's all folks!
Hopefully, this introduction to using the Fear Conditioning system in experiments will have provided you with a firm grasp of the basics of the system. You can then explore other help topics which describe in detail the areas relevant to your work.
And don't forget that ANY-maze Support are always available to provide assistance. Our support is by no means limited to resolving problems such as 'something doesn't work'; we're more than happy to provide advice on how best to set up a protocol, or to clarify something that you're unsure about - so please, if you get stuck just drop us a line at support@anymaze.com

© Copyright 2003-2026 Stoelting Co. All rights reserved
ANY-maze help topic T1262