ANY-maze Help > I/O devices supported by ANY-maze > Accessories designed specifically for ANY-maze > The ANY-maze multifunction remote > Learning your way around the multifunction remote > The multifunction remote menu
The multifunction remote menu
![]()
Introduction
The multifunction remote has a menu system that allows you to access all of its functions. The menu is shown at the bottom of the display, with the currently selected item in reverse-type.
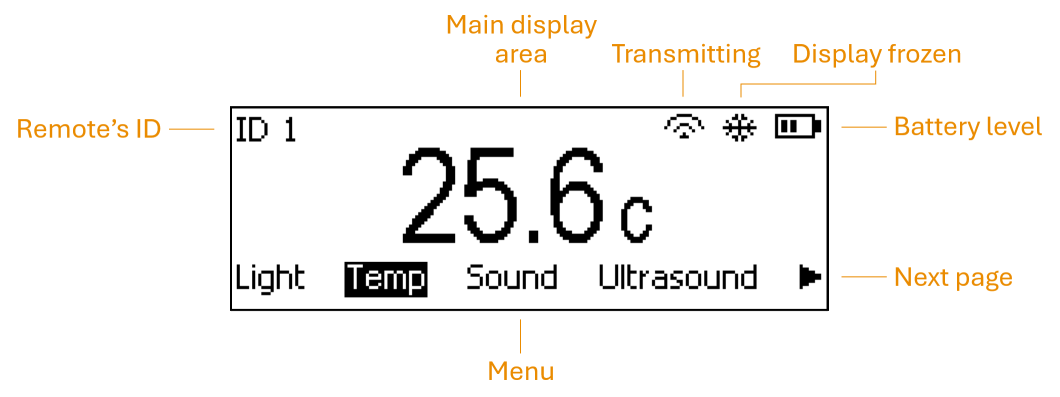
Figure 1. The multifunction remote display with the 'Temp' menu item selected.
| • | Navigating the menu | • | Haptic |
| • | Light | • | Sleep |
| • | Temp | • | Freeze |
| • | Sound | • | Channel |
| • | Ultrasound | • | Mode |
| • | ID | • | Update |
| • | Backlight | • | About |
Navigating the menu
Pressing the Next button moves through the menu items.
There are more menu items than will fit across the bottom of the display. On the far right of the menu is an arrow icon; selecting it and pressing the Enter button will take you to the next page of menu items. The next page will have a left arrow icon at the far left; selecting it and pressing the Enter button will return to the previous page.
Light
Displays the current light level. For more information see Using the multifunction remote to measure light levels.
Temp
Displays the current temperature. For more information see Using the multifunction remote to measure temperature.
Sound
Displays the current sound level. For more information see Using the multifunction remote to measure sound levels.
Ultrasound
Displays the current ultrasound level. For more information see Using the multifunction remote to measure ultrasound levels.
ID
Allows you to change the ID of this multifunction remote. The IDs you can choose from are defined in ANY-maze, but they will always be between 1 and 16 (though not all of them may be available). For example, in ANY-maze, you might choose to work with remotes with IDs 1, 2, and 4. In this case, pressing the Enter button when the ID menu item is selected will cycle through the following options:
Remote ID 1
Remote ID 2
Remote ID 4
| Remotes have a default ID of 1. If this ID is set not to be used in ANY-maze, you will need to change the remote's ID before it can communicate with ANY-maze. |
Backlight
Turns the screen backlight on or off. Pressing the Enter button switches between the following options:
Backlight on (Default)
Backlight off
It is recommended to keep the backlight on, but be aware that it consumes a significant amount of power, so the battery will typically last more than 25% longer if the backlight is off.
| The backlight always switches off when the remote goes to sleep, regardless of the setting here. |
Haptic
This option controls when the remote provides haptic feedback. Pressing the Enter button cycles through the following settings:
| On success only (Default) | The remote vibrates to signal success but does not vibrate to signal failure. |
| On success & failure | The remote vibrates to signal both success and failure. |
| Haptic feedback off | The remote does not vibrate in any situation. |
The remote uses three types of vibrations to provide feedback:
| • | A short vibration for success |
| • | A long, gradually fading vibration for failure |
| • | Two quick pulses when a question is displayed on the screen |
Sleep
| Sometime the fact that the device sleeps quite quickly can be frustrating. For example, if you are moving around a room determining the light level in different locations, then it would not be helpful if the screen is continually turning off. To address this, you can hold down the Next button, doing so will prevent the device from going to sleep until you release the button (when it will go to sleep after the usual sleep period). Note however, that this will decreases the battery life. |
This setting adjusts how long the remote stays awake after the last button press before going to sleep. Pressing the Enter button cycles through the following options:
Sleep after 15s (Default)
Sleep after 20s
Sleep after 25s
Sleep after 30s
To wake the remote press either the Next button or the Enter button, note that the key will NOT perform its normal function; it will just wake the remote up.
You can also press a test control button while the remote is asleep. In this case the screen WON'T turn on, but the remote WILL transmit the button press to ANY-maze, and, if set to do so, the device will signal success or failure through haptic feedback. The reason the screen remains off is to avoid changing the ambient conditions (by switching on the screen backlight) which might affect the animals being tested. This is also why the device uses haptic feedback instead of a beep.
The sleep time you set has the biggest impact on battery life. For example, if you increase the sleep time from 15s to 30s, the battery will last half as long. The remote uses very little power when it is asleep - a good-quality alkaline battery (such as a Duracell) will last well over a year when the device is asleep.
Freeze
When a sensor is selected and you press the Enter button, the current sensor reading is 'frozen,' meaning the reading stops updating on the screen and the 'Frozen' symbol appears. While the reading is frozen pressing the Enter button will transmit it to ANY-maze.
This feature is especially useful when you need to take a reading in a location where you can't see the screen, such as inside a sound-attenuating chamber. You can place the device inside the chamber and press the Enter button; when you remove it, the screen will still display the frozen value. (Without this feature, upon removal, the screen would immediately update to show the value outside the chamber.) After a set interval, the screen 'unfreezes,' and the sensor begins updating again.
This menu option allows you to set how long the device remains frozen. You can choose from the following options:
| Freeze for 5s (Default) | During the 5s pressing the Enter button will transmit the reading shown to ANY-maze. |
| Freeze for 10s | During the 10s pressing the Enter button will transmit the reading shown to ANY-maze. |
| Freeze for 20s | During the 20s pressing the Enter button will transmit the reading shown to ANY-maze. |
| Freeze for 30s | During the 30s pressing the Enter button will transmit the reading shown to ANY-maze. |
Channel
The multifunction remote uses a radio signal to communicate with the receiver (which should be plugged into a USB port on the computer running ANY-maze). The radio can operate on any one of 8 different channels, but the remote and receiver MUST be set to the same channel. The default channel is 1, but you can change it here. Pressing the Enter button cycles through the following options:
Channel 1 (Default)
Channel 2
Channel 3
Channel 4
Channel 5
Channel 6
Channel 7
Channel 8
You typically won't need to change the channel unless you are using more than one multifunction remote in the same environment. For example, if someone in a nearby lab is also using an ANY-maze multifunction remote to start tests with their apparatus, you might find that starting their test also triggers yours! This would happen if both remotes were using the same channel. In this case, you would need to change the channel on one of the systems so they are different. You can choose any channel, but remember, you MUST also change the channel on the receiver.
Mode
The multifunction remote is primarily designed to work with ANY-maze, but you can also choose to use it in 'Standalone mode'. In this mode, the device is not associated with ANY-maze and will not transmit any data or start any tests. However, you can still use it to measure light, temperature, sound levels, and ultrasound.
This option allows you to choose the mode the remote should operate in. Pressing the Enter button cycles through the following options:
ANY-maze mode (Default)
Standalone mode
In Standalone mode, the remote behaves differently in several ways:
| • | The 1, 2, 3, and 4 buttons will not start tests and have no function at all. |
| • | The ID of the remote is not shown in the top left corner, and the 'ID' menu option is not available. |
| • | No haptic feedback will be generated, so the 'Haptic' menu option will not be shown. |
| • | The device will not transmit via its radio, meaning the 'Transmitting' symbol will not be shown, and the 'Channel' menu option will not be available. |
Update
The multifunction remote's firmware can be updated by ANY-maze, which will notify you when an update is available. The update process is initiated from within ANY-maze and is described in detail in Updating the multifunction remote firmware. To perform the update, you will need to select this menu option on the remote.
Note that the remote cannot be updated if the battery is low. The device automatically checks for this, so you don't need to worry about it — although you may need to replace the battery before proceeding.
The update process is designed to be all-or-nothing. If the update fails for any reason, the device will simply continue using the old firmware. This ensures that you can't 'brick' the device by attempting an update - if the update fails, you can simply try again.
About
This menu option shows information about the multifunction remote:
| Hardware version | The version of the multifunction remote's hardware. This value will never change. |
| Firmware version | The version of the current multifunction remote firmware. This will change when the firmware is updated. |
| Battery voltage | The voltage of the battery. A new battery will start at around 9.5V and will decrease to 6.1V at which point the remote will stop working. |
| Last error | Any value other than 'None' implies some sort of error has occurred and should be reported to ANY-maze Support. |
This information can be useful if you need to contact us for support.
![]()
© Copyright 2003-2026 Stoelting Co. All rights reserved
ANY-maze help topic T1449