ANY-maze Help > I/O devices supported by ANY-maze > Legacy I/O devices > The ANY-maze interface (AMi) > Installing and configuring AMi
Installing and configuring AMi
![]()
| You MUST install the AMi driver software before you plug AMi into your computer. |
Setting up AMi
Setting up AMi is a four-step process:
| • | Install the AMi driver software |
| • | Connect AMi to your computer |
| • | Configure AMi |
| • | Connect your apparatus to AMi and test it |
Install the AMi driver software
| You must be running ANY-maze as an administrator in order to install drivers. To do this, right-click on the icon you use to start ANY-maze and then select 'Run as administrator' from the menu which appears. (If you run ANY-maze by clicking on an icon in the Windows task bar at the bottom of the screen, then you should right-click the icon, then right-click the entry that reads 'ANY-maze' and then select 'Run as administrator' from the menu which appears). |
IMPORTANT: You should install the driver software BEFORE you connect AMi to your computer.
The AMi driver software is a standard component of the ANY-maze system and can be installed from within ANY-maze itself by following these steps:
| 1. | Close any open experiment. |
| 2. | Switch to the Support page. |
| 3. | In the list on the left side of the page, select Drivers. |
| 4. | The right-hand side of the page will display the ANY-maze driver settings (see figure 1 below) and towards the top of the list you will see an entry for 'ANY-maze USB devices' which will report the current installed state of the driver. |
| 5. | If the driver is not installed, first select it in the list and then click the |
For further details, see the ANY-maze USB device driver topic.
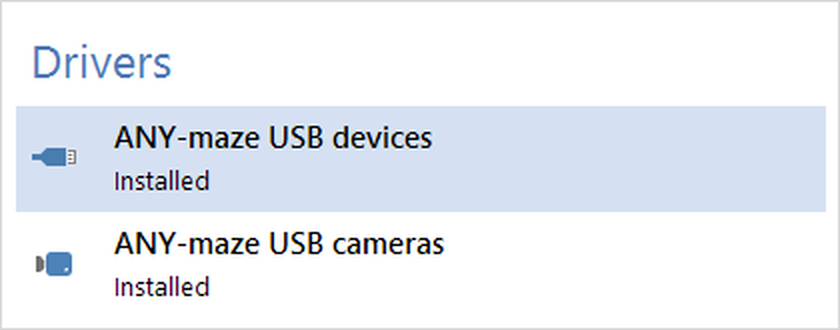
Figure 1. To install the AMi driver you should select the ANY-maze USB driver entry and then click 'Install' in the ribbon bar.
Connect AMi to your computer
Having installed the AMi driver, you are ready to connect AMi to your computer - simply plug AMi into any USB port. At this stage, there is no need to connect the DC power cord to AMi, although you can if you want to. After a short delay Windows will recognise that AMi is a new device and will install it. You probably won't see any overt indication that the device is being installed, although Windows may show an 'Installing new hardware' icon in the bottom right of the task bar.
Configure AMi
With AMi connected to your computer, you are ready to use it in ANY-maze. Like all I/O devices supported by ANY-maze, AMi is configured and tested using the I/O page. So the first step is to switch to the I/O page and check that AMi is shown in the list on the left - see figure 2, below.
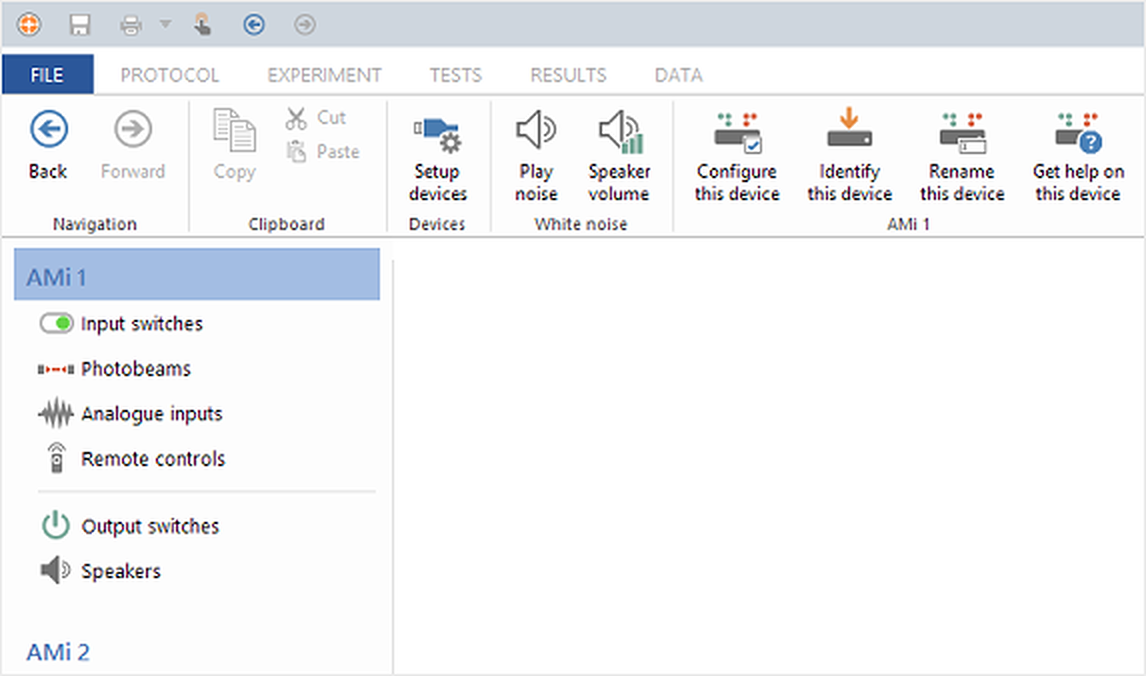
Figure 2. After connecting an AMi device to your computer, it will automatically be listed on the left of the I/O page.
As you can see in the above figure, each AMi you attach will automatically be given a name of 'AMi 1', 'AMi 2' and so on.
Identifying an AMi device
If you have more than one AMi connected to your computer, you may wonder which device is AMi 1 and which is AMi 2. To find out, select one of the devices in the list and then click the ![]() Identify this device button in the ribbon bar. The green light on the front of the selected AMi will start to blink; click the button again to switch the blinking off.
Identify this device button in the ribbon bar. The green light on the front of the selected AMi will start to blink; click the button again to switch the blinking off.
Renaming an AMi device
Having worked out which AMi is which, you may want to rename them to something more meaningful than AMi 1 and AMi 2. You might also want to do this even if you only have 1 AMi device, so it's clearer to your co-workers what the AMi device does. For example, if an AMi is being used to connect to a series of Skinner boxes, then you may want to rename the device to 'Skinner box interface'.
To rename an AMi, simply select it in the list on the left and then click the ![]() Rename this device button in the ribbon bar. The Rename input/output device window will open where you can enter the new name.
Rename this device button in the ribbon bar. The Rename input/output device window will open where you can enter the new name.
Configuring an AMi device
As is obvious if you just look at your AMi device, it has a large number of different connectors (or ports), but what may not be so obvious is that some of these ports can be configured in different ways. For example, AMi has 16 General Purpose Input/Output (GPIO) ports, each of which can be individually configured.
To configure an AMi device, you should first select it in the list on the left side if the I/O page and then click the ![]() Configure this device button in the ribbon bar. The AMi configuration window (see figure 3) will open. As well as allowing you to configure some of the ports of your AMi device, this window also provides information about the version of your device and lets you perform maintenance operations such as reprogramming the device and altering its ID. Full details can be found in the Configuring AMi topic.
Configure this device button in the ribbon bar. The AMi configuration window (see figure 3) will open. As well as allowing you to configure some of the ports of your AMi device, this window also provides information about the version of your device and lets you perform maintenance operations such as reprogramming the device and altering its ID. Full details can be found in the Configuring AMi topic.
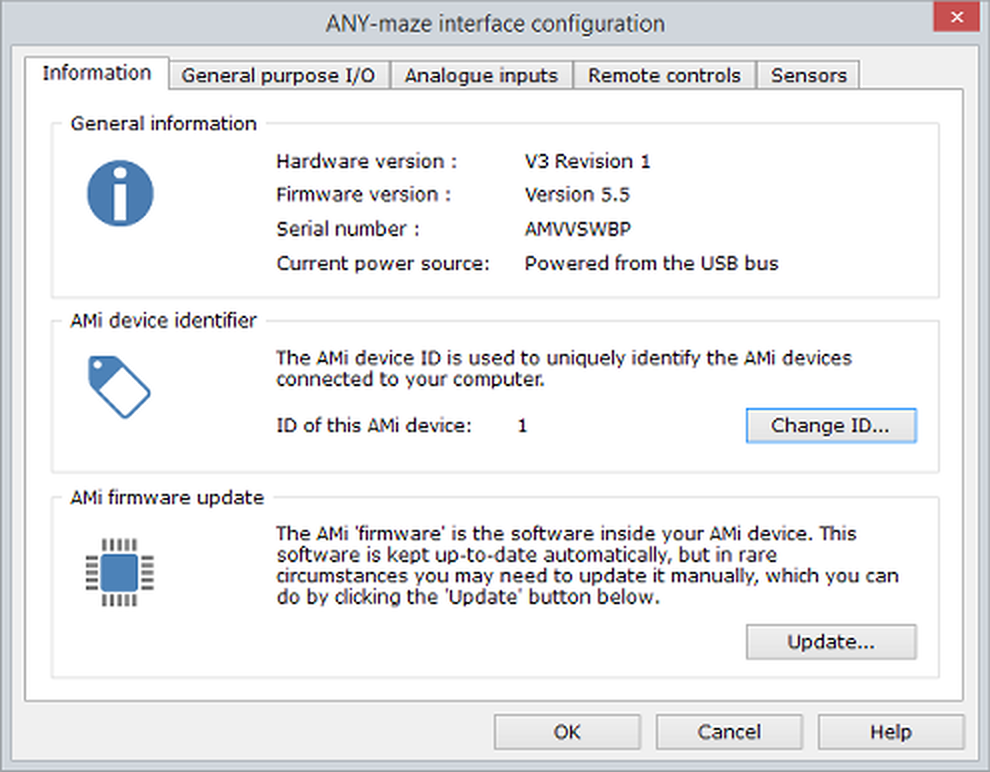
Figure 3. The AMi configuration window.
Connect your apparatus to AMi and test it
So with AMi connected and configured, you're ready to actually connect your apparatus to it. Of course, exactly how you'll do this depends on what the apparatus is and, as AMi is so flexible, there are a wide range of options.
I don't intend to go into all the details here, as they're covered in other topics, but suffice to say that in many cases, you'll simply need to connect a couple of wires to AMi (which uses convenient pluggable, screw terminal blocks for most connections) and you'll be done.
But once you have wired your device to AMi, you're obviously going to want to know if it works and this is the main purpose of the ANY-maze I/O page. Let's take a brief look at an example:
Imagine you have a step-down passive avoidance apparatus. In this apparatus, the animal is placed on a sprung platform such that when it is on the platform, its weight depresses a micro-switch; when it steps down, the platform raises slightly, opening the switch - when this happens you want to turn on a shocker for a short period.
So, you would probably connect the micro-switch to one of AMi's General purpose I/O ports (let's assume you use GPIO port 1) and connect the shocker to a Switch output port (again, let's assume you use port 1). Having done this, you'd now want to confirm that AMi can detect the platform position (i.e. the micro-switch being open or closed) and can control the shocker.
To perform these tests, you would first select the AMi device in the list on the left of the I/O page, which would cause the AMi's ports to be shown. You'd then select the Input switches item in the ports list - see figure 6.
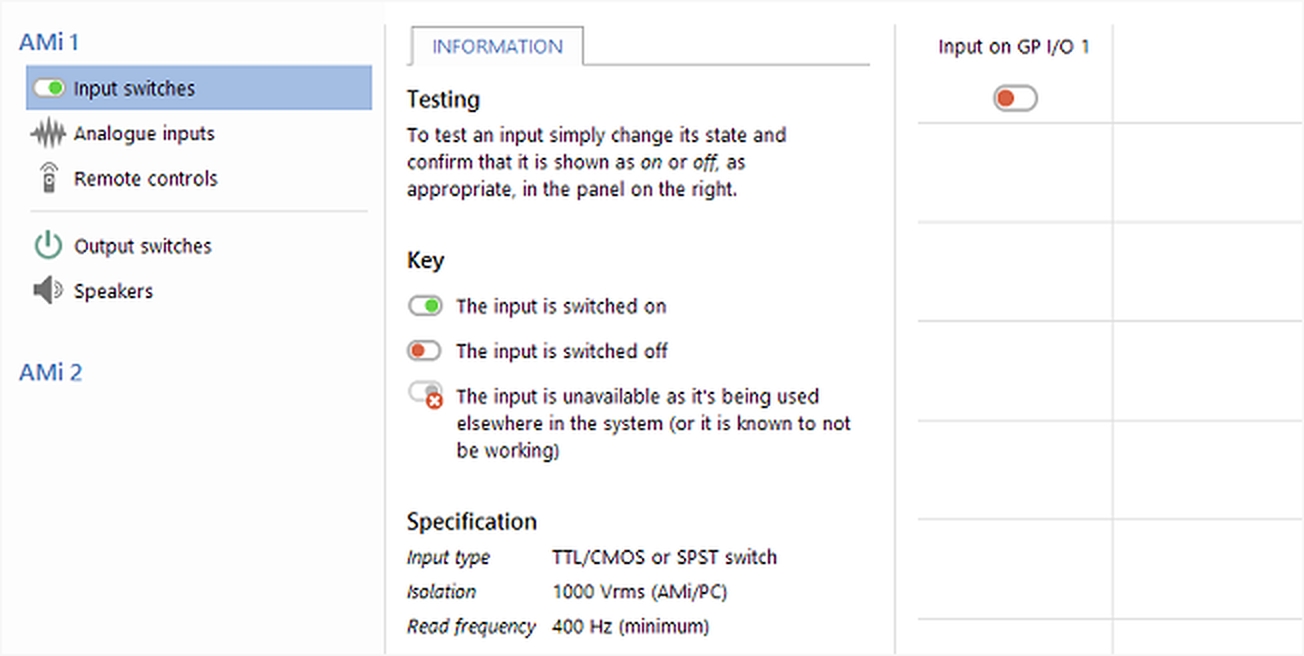
Figure 6. Testing an input switch connected to AMi using the ANY-maze I/O page.
As can be seen, the figure shows the input on GP I/O 1 as inactive (red). You'd then press the platform down (closing the micro-switch) and check that the port was shown as active (green).
To test the shocker, you would select the entry for Output switches in the Device ports panel and you would see something like figure 7.

Figure 7. Testing an AMi output switch using the ANY-maze I/O page.
Here, clicking the image for Output switch 1 would switch the shocker on and the image would turn green (as shown in figure 7). Clicking the image again would switch the shocker off, and the image would revert to being red.
So now you would have confirmed the connections to your micro-switch and your shocker, and you'd be ready to design a protocol that uses these items to actually perform an experiment.
![]()
© Copyright 2003-2026 Stoelting Co. All rights reserved
ANY-maze help topic T1151