ANY-maze Help > The ANY-maze reference > The Tests page > Running tests > Before starting a test > Specifying what's displayed during a test
Specifying what's displayed during a test
![]()
Introduction
While a test is running ANY-maze can:
| • | Indicate the animal's centre point |
| • | Indicate the position of the animal's head and/or tail |
| • | Highlight the part of the image it considers to be the animal |
| • | Show the animal's orientation |
| • | Indicate the zone(s) which it considers the animal to be in |
| • | Indicate which, if any, 'behaviour keys' are pressed |
| • | Indicate whether it considers the animal to be immobile |
| • | Indicate whether it considers the animal to be freezing |
With a few exceptions you can choose any combination of these indicators or, if you like, none at all.
These options can be set from within the protocol, using the What to display while testing element, but they can also be changed from within the Tests page by clicking the Tracking indicators button in the ribbon bar, which opens the pop-up window shown below.
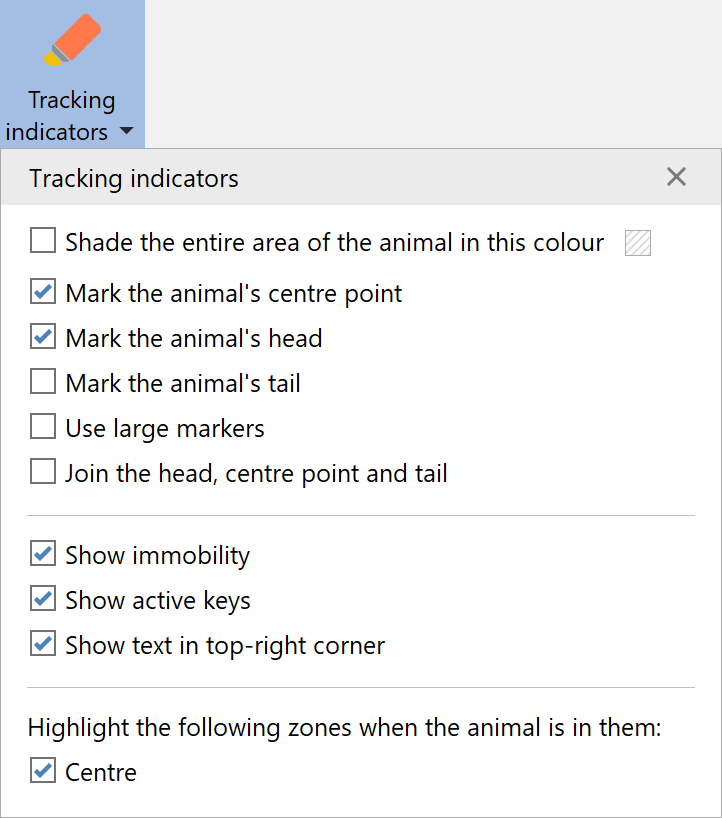
Figure 1. The tracking indicators button in the ribbon bar allows you to easily change almost all the tracking indicators at any time, including while a test is running.
Indicating the animal's centre point
By default, ANY-maze indicates the centre of the animal using a small orange dot. You can choose whether it is displayed using the What to display while testing element of the protocol or via the Tracking indicators button on the Tests page. You can change the colour of the dot using the Appearance section of the Options page.
Indicating the position of the animal's head and/or tail
If you have chosen to track the animal's head and tail, ANY-maze will indicate the position of the animal's head using a small green dot and the position of the tail using a small yellow dot. You can change the colours of the dots using the Appearance section of the Options page.
When tracking the head, you also have the option to show lines which join the animals head and tail to the centre point - see figure 2.
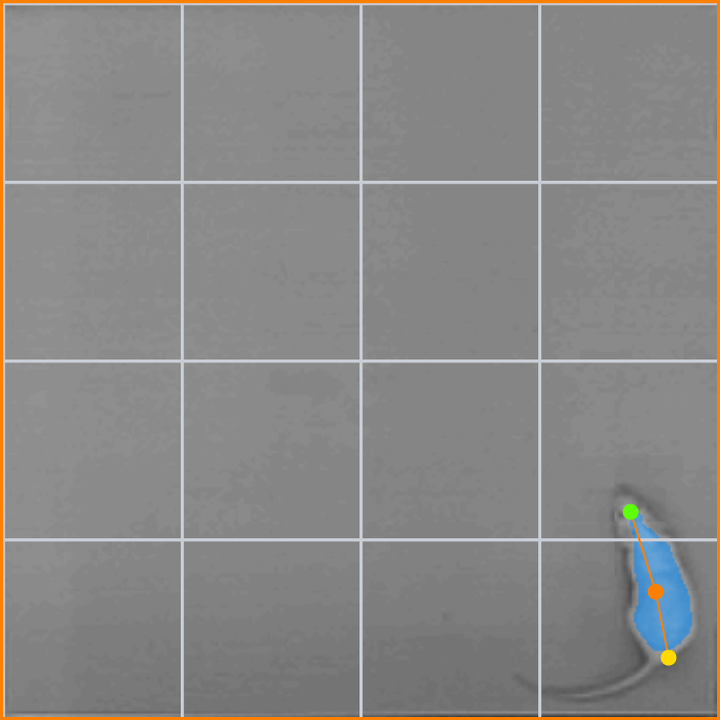
Figure 2. In this test all possible animal markers are shown: The centre, head and tail points, along with lines that join the head and tail to the centre.
Highlighting the part of the image ANY-maze considers to be the animal
ANY-maze can indicate the entire area of the animal by shading it (by default) in blue - see figure 2, above. You can change whether the shading is shown, and what colour should be used, from the What to display while testing element of the protocol or via the Tracking indicators button on the Tests page.
Showing the animal's orientation
If ANY-maze is analysing the animal's orientation towards zones or points then, by default, it will show the orientation as in figure 3 below.
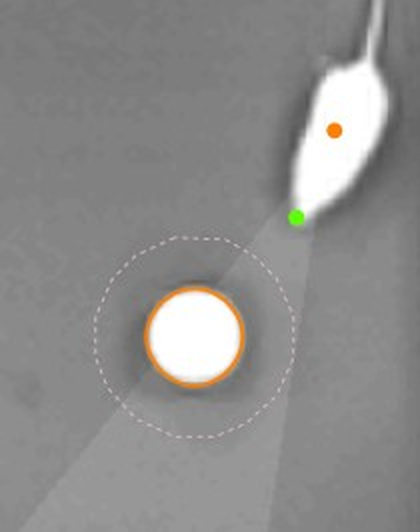
Figure 3. The flashlight-like area shows the orientation arc (here the orientation angle was set to 30°).
You can select whether the shading is shown using the What to display while testing element of the protocol or via the Tracking indicators button on the Tests page.
Indicate the zone(s) which ANY-maze considers the animal to be in
ANY-maze can indicate which zone (or zones) it considers the animal is in by highlighting them in green and/or display the zones' names next to the position of the animal. This can be very useful if you want to check that zone entries are being scored correctly, especially when they're based on the entire area of the animal.
To specify that a zone is highlighted you should check the relevant box in the What to display while testing > Zone highlighting option of the protocol, or by selecting the zone in options displayed by the Tracking indicators button on the Tests page. You can change the colour used to highlight zones using the Appearance section of the Options page.
As you can specify zone highlighting on a zone by zone basis, you can choose to switch it on for some zones and off for others. This can be very helpful if two zones share certain parts of the apparatus, or if one zone is entirely enclosed in another one - in these cases highlighting all zones can become quite confusing.
Indicating which, if any, 'behaviour keys' are pressed
If an experiment's protocol includes any keys that are being used to score behaviours that ANY-maze can't detect automatically (such as grooming or rearing), then you can choose to have the behaviour's names displayed next to the animal while the relevant key is pressed (i.e. while the behaviour is occurring). This acts as a nice confirmation that the system is registering the behaviour and can also help you to remember that you're holding the key down!
You specify whether the names of active behaviours are shown using the What to display while testing element of the protocol, or via the Tracking indicators button on the Tests page.
Indicating whether ANY-maze considers the animal to be immobile
As part of the tracking options you can specify whether ANY-maze should detect periods when it considers the animal to be immobile. If you choose to do this then ANY-maze will display the text Immobile next to the animal (or in the top right corner of the test window) whenever it considers the animal to be immobile. You can choose whether/where to show this, using the What to display while testing element of the protocol, or via the Tracking indicators button on the Tests page.
Indicating whether ANY-maze considers the animal to be freezing
As part of the tracking options you can specify whether ANY-maze should detect periods when it considers the animal to be freezing. If you choose to do this then ANY-maze will display the text Freezing next to the animal (or in the top right corner of the test window) whenever it considers the animal to be freezing. You can choose whether/where to show this, using the What to display while testing element of the protocol, or via the Tracking indicators button on the Tests page.
![]()
© Copyright 2003-2026 Stoelting Co. All rights reserved
ANY-maze help topic T0801