ANY-maze Help > The ANY-maze reference > The Tests page > The Test window
The Test window
![]()
Introduction
The Test window contains everything that you need to run a single test in an apparatus. It consists of the following parts:
| • | A Tool bar, containing buttons for controlling testing. |
| • | A text description of what's happening in the apparatus, and (if relevant) details of any video being played. |
| • | Various panels, each of which shows information about a specific area of the test (for example, Zones or I/O). These can be arranged in a number of ways. |
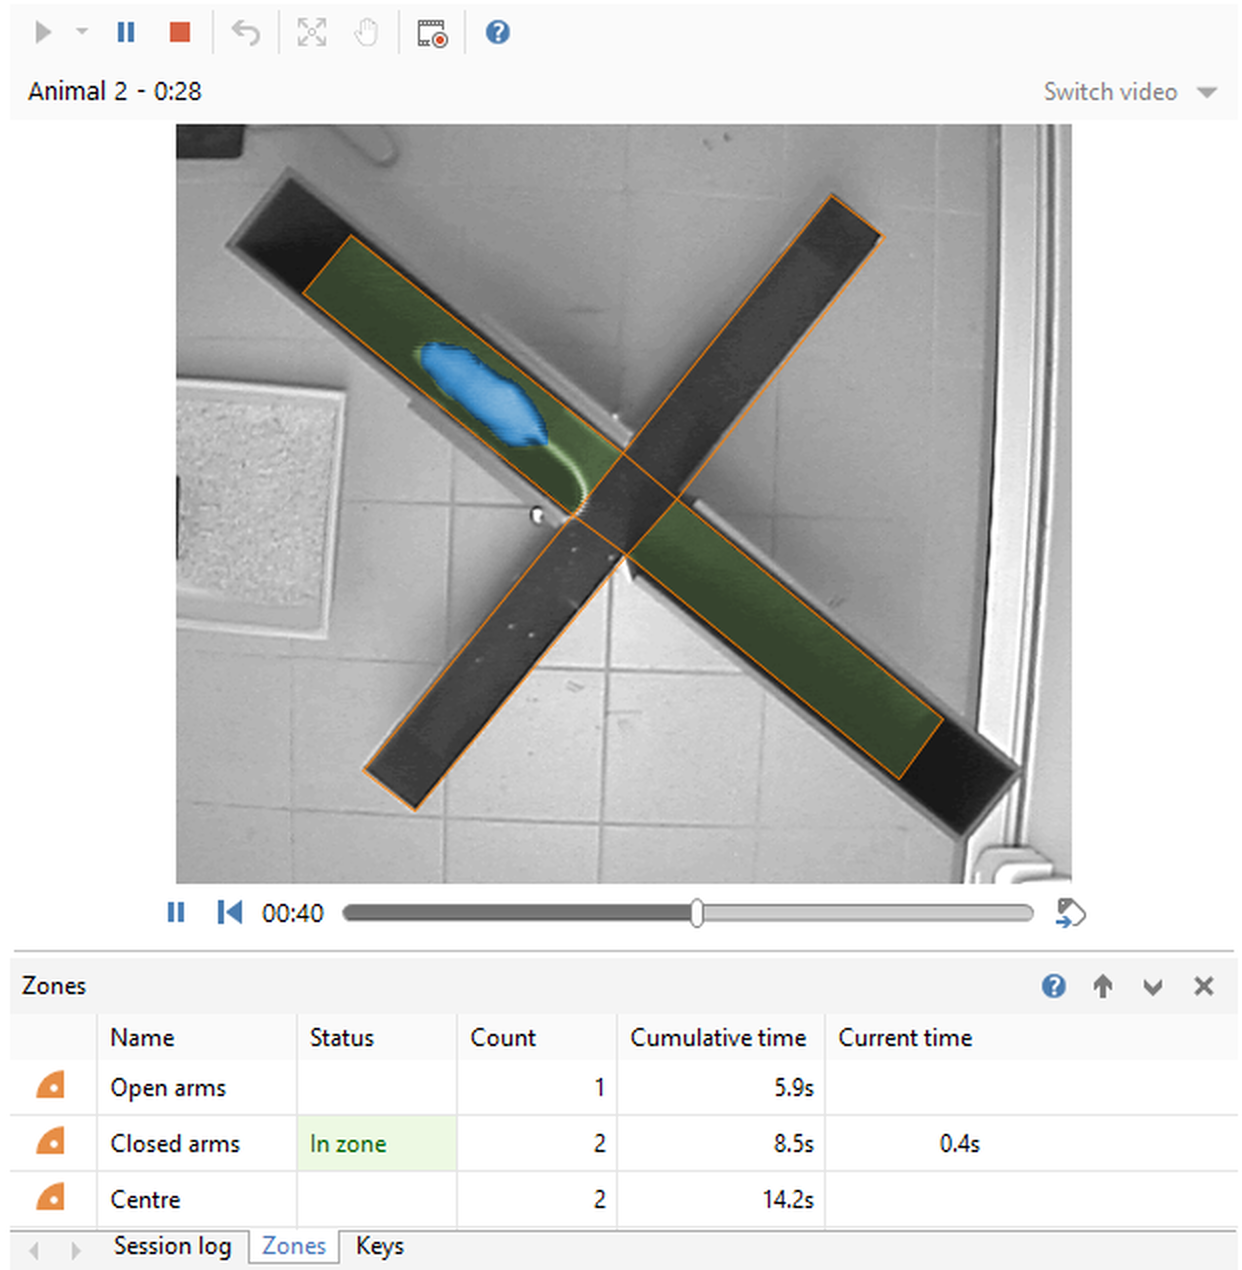
Figure 1. The Test window. This shows the tool bar containing the buttons used to run the test, together with details of the test currently being run on animal . Here, the main (promoted) panel is showing the video image of the apparatus, and the tabbed section at the bottom is currently showing information about zone entries.
Details
The Tests page will contain one Test window for each apparatus that you have set up in your protocol. If you're using multiple apparatus, these may all be visible simultaneously, or may be arranged in such a way that you need to click on a thumbnail or scroll the panel to see them. For more details on the ways you can arrange multiple apparatus, see Adjusting the apparatus layout.
The various parts of the Test window are described in detail below.
The Tool bar
This contains the buttons used to control the test, along with other options for this apparatus. See buttons for controlling testing for more details of these buttons.
The test description
This will contain a description of what's happening in the Test window. For example, when waiting for a test to begin in the apparatus, it will say something like 'Animal 6 - Ready...' indicating the animal that will be tested next. While the test is running, you'll see details of the animal being tested and a test clock.
Occasionally, there may be some reason that the test can't start - for example, if something in your protocol is not set up correctly, or your test relies on an I/O device that is not connected to the computer - in which case this will give a brief description of what the problem is. Resolving the problem will return the state to 'Ready...'.
The video being played
If you're tracking from video, rather than from a live image, then this will show the file name of the video (unless you've this turned off in the What to display while testing section of the protocol). Otherwise, you'll simply see the option to 'Switch video'. In either case, you can change the video file being played by clicking on the drop-list next to the text.
For more details, refer to Tracking in a video of a test.
The panels
The panels on the Test window can be arranged in a number of ways. For full details of the options, see Test window panel settings, but in summary you can arrange them as:
| • | A single set of tabbed panels (only one panel is visible at a time) |
| • | A main 'promoted' panel at the top, and a tabbed section at the bottom showing the other available panels (one of which is visible along with the main panel) |
| • | A main 'promoted' panel at the left, and a tabbed section to the right showing the other available panels (one of which is visible along with the main panel) |
Exactly which panels are available, and which of them are actually shown, depends on how your protocol is set up. For example, in a standard video-tracking experiment you would probably choose to set the Video panel to be the main panel, but in an I/O only experiment (where the Video panel would actually be unavailable) the I/O Status panel would be a more logical choice. Note that any panel can be 'promoted' to be the main panel; there are no rules.
Here's a full list of all the panels; these are links which will take you to a more detailed description of that panel:
| • | The Session log panel |
| • | The Errors & Warnings panel |
| • | The Video panel |
| • | The Dashboard panel |
| • | The Zones panel |
| • | The Sequences panel |
| • | The Activity panel |
| • | The Keys panel |
| • | The I/O Status panel |
| • | The Virtual Switches panel |
| • | The Charts panel |
As mentioned above, which panels are shown and how they are laid out is defined in the protocol, but it can also be set from the Test Page's Panel Settings window (see figure 2), which is often more convenient than switching to the Protocol page.
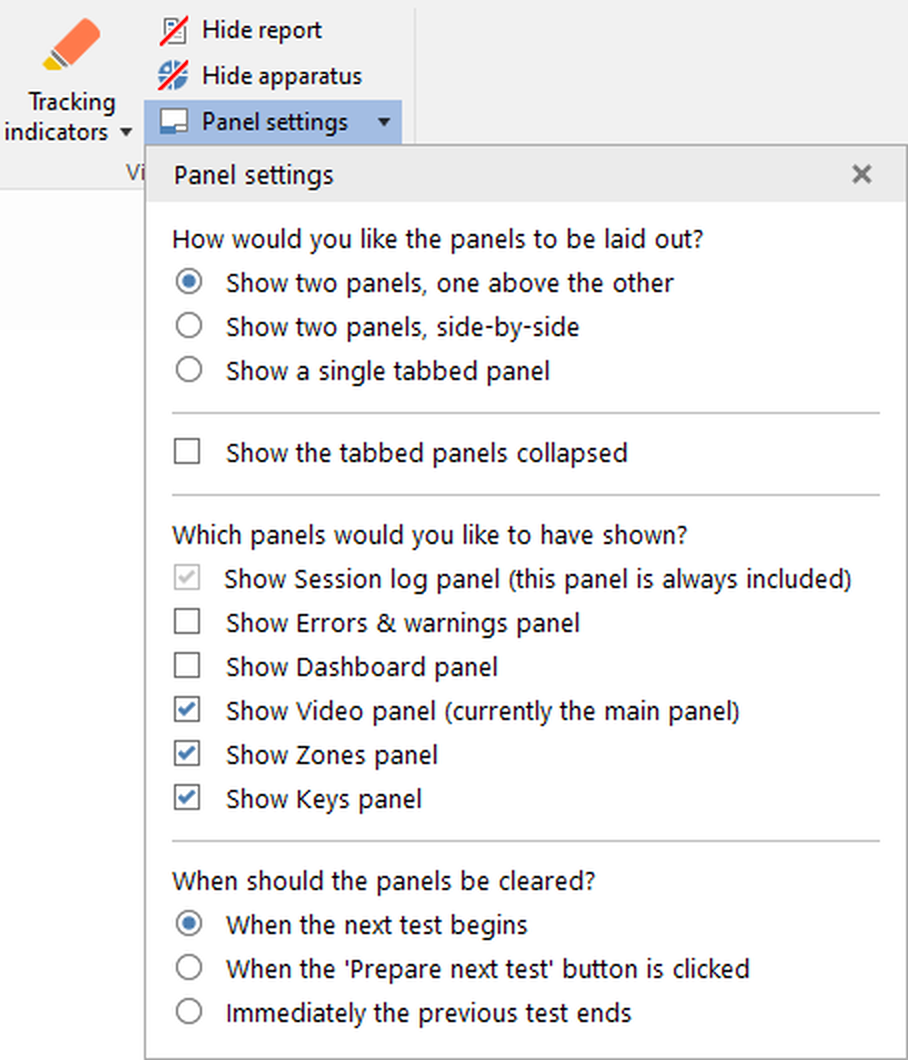
Figure 2. The Panel Settings window
The information that you see in the panels will generally persist at the end of the test (depending on how you've set the Test window panel settings in the protocol). For more information, see Clearing test information ready for the next test.
![]()
© Copyright 2003-2026 Stoelting Co. All rights reserved
ANY-maze help topic T0781